Introduction
Bromo photography in dry season – Mount Bromo, one of Indonesia’s most iconic volcanoes, is a dream destination for photographers. With its surreal landscapes, golden light, and mystical atmosphere, the dry season is often the best time to capture its beauty. But how do you make the most of your photography trip to Bromo during this season? Let’s dive into the best tips to help you return home with stunning shots.
Why the Dry Season is Perfect for Bromo Photography
Clear Skies and Golden Light
Bromo Photography in dry season, usually between May and October, offers crisp skies that make sunrise and sunset photography breathtaking. Without heavy clouds, the light falls gently across the landscape, giving you vibrant colors and defined textures.
Stable Weather Conditions
Unlike the rainy season, where unpredictable showers can disrupt plans, the dry months provide more consistency. You can plan sunrise hikes or golden hour shoots with confidence.
Understanding Mount Bromo’s Unique Landscape
The Volcanic Terrain
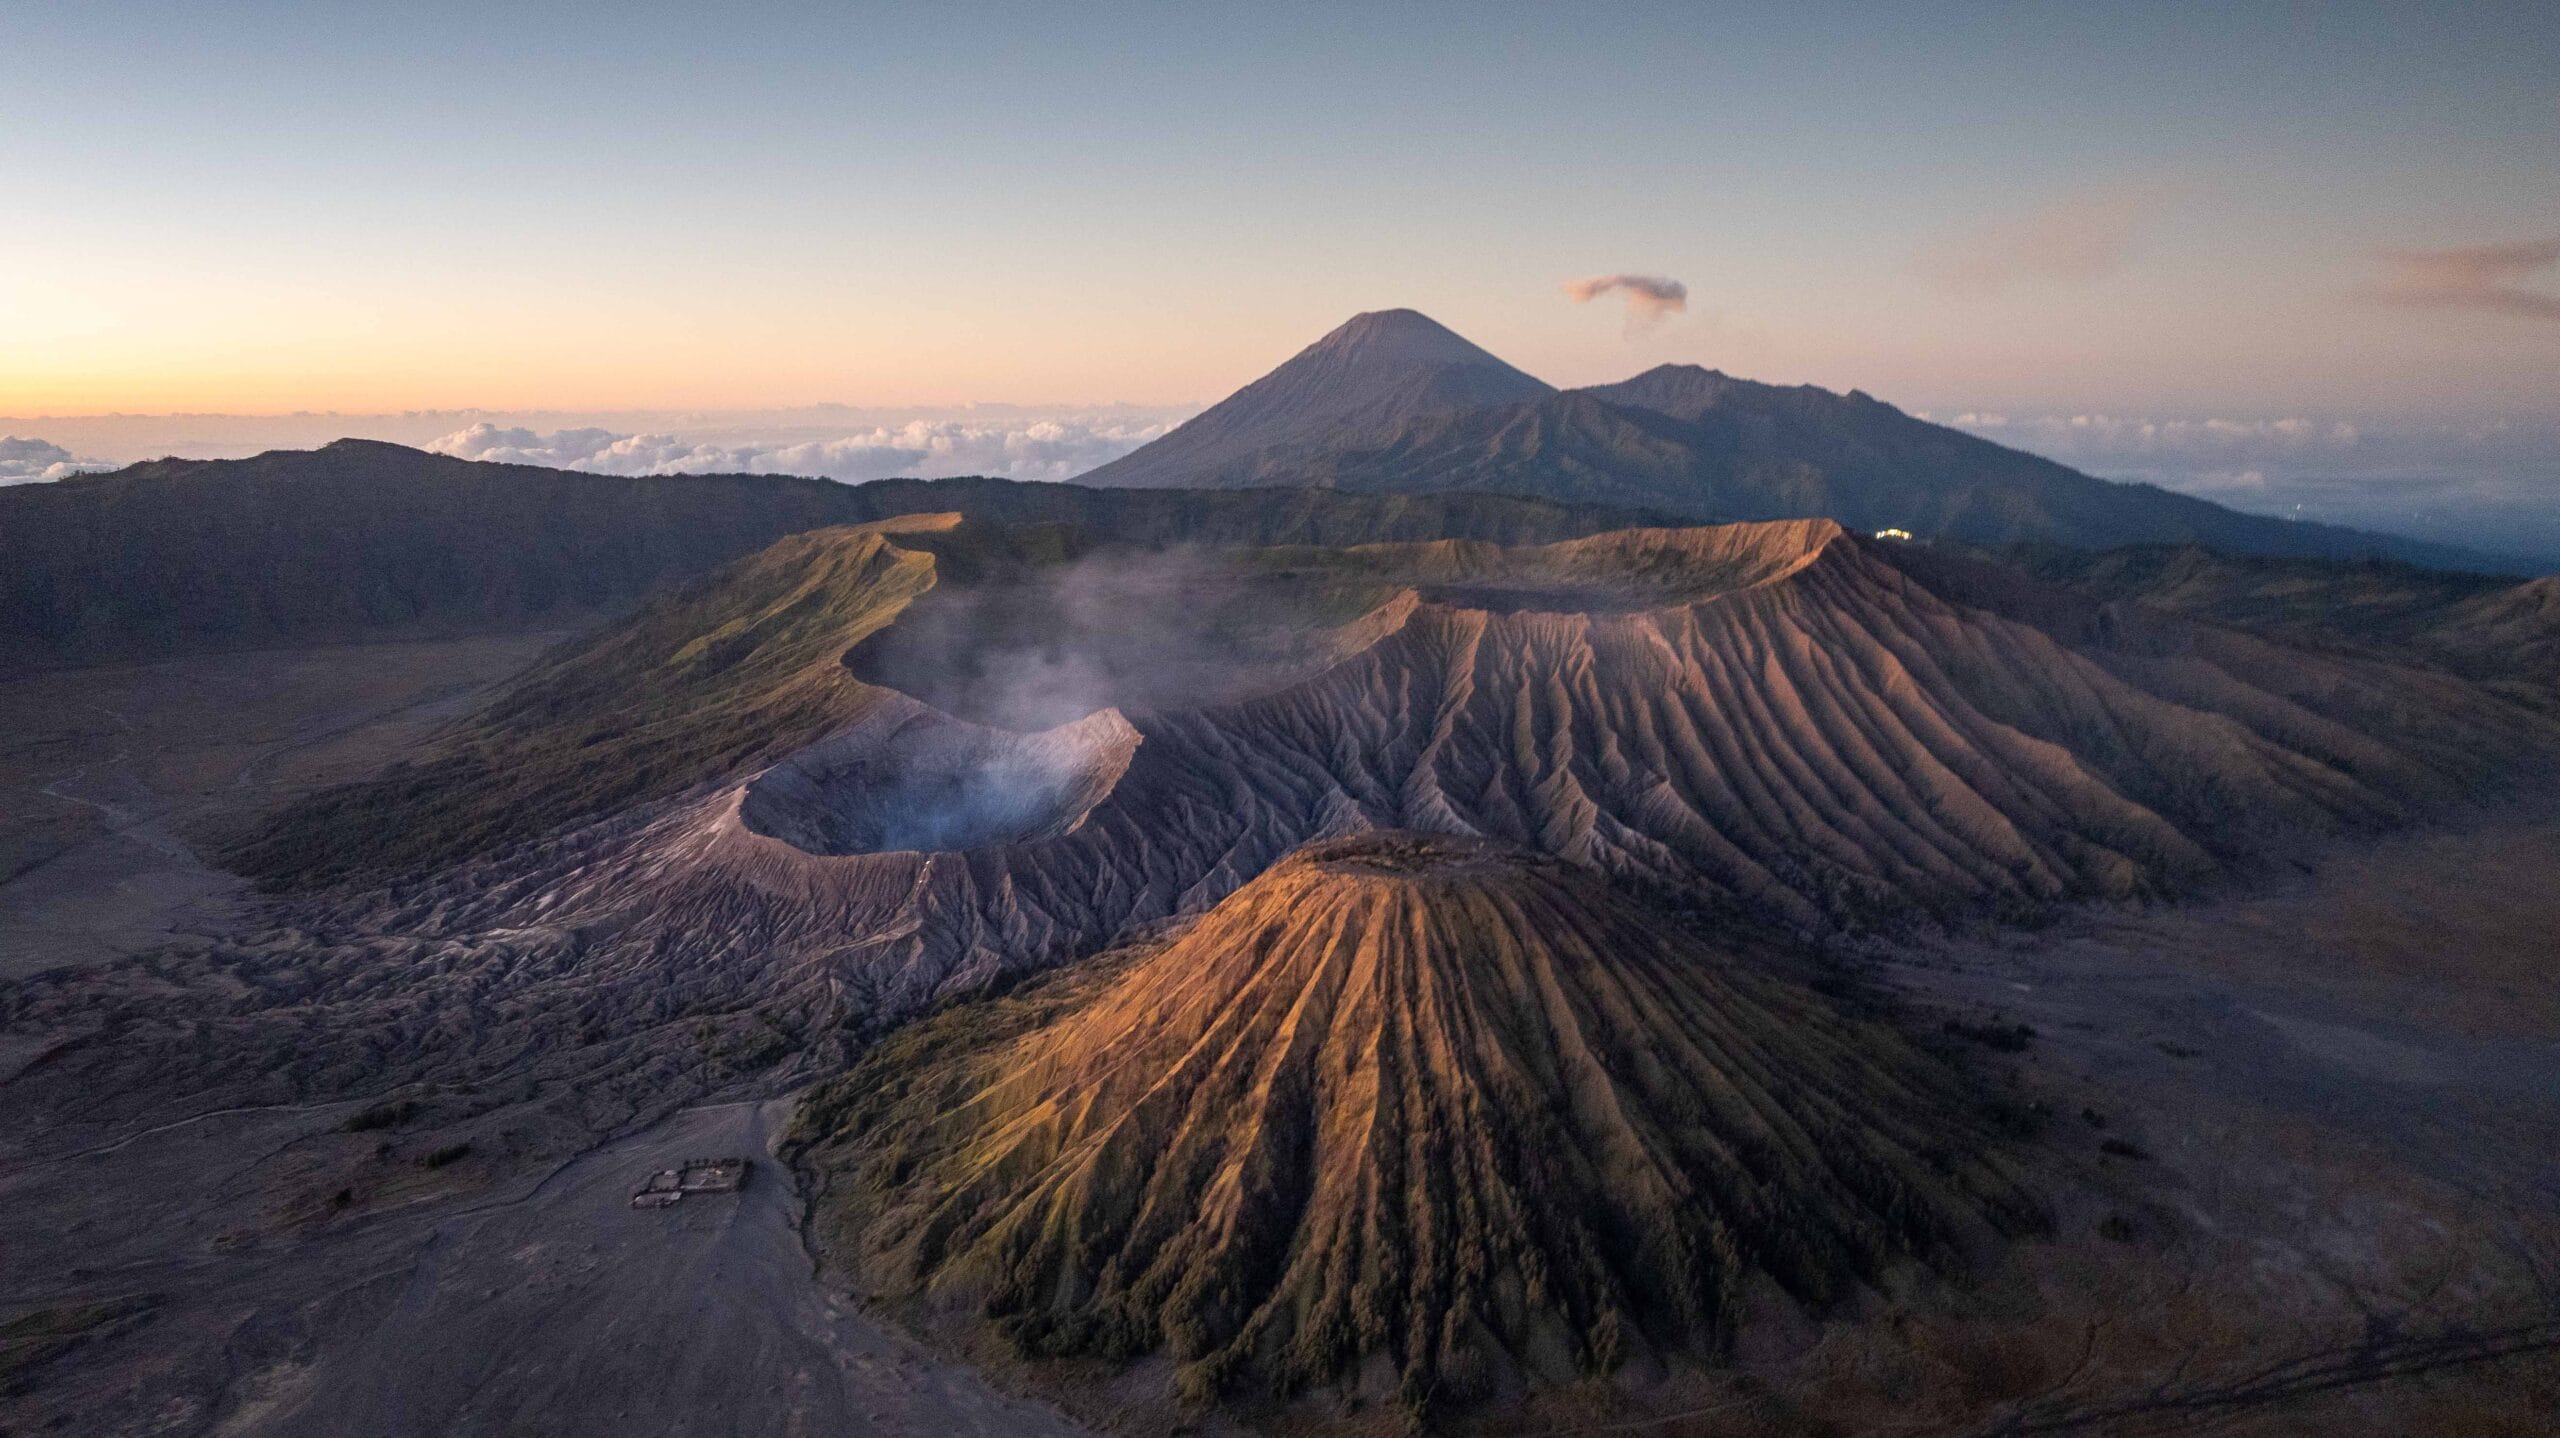
Mount Bromo’s crater, surrounded by layers of volcanic ash, offers an otherworldly setting. Its smoky plume adds drama to wide-angle shots.
Whispering Sands and Savannah
Beyond the crater lies a vast expanse of sand dunes and grassy savannahs. These locations allow you to capture contrasting textures and tones within a single frame.
Best Time of Day for Mount Bromo Photography in the Dry Season
Capturing the Magic of Sunrise Over the Volcano
The sunrise at Mount Bromo is the highlight for most photographers. As the first light of day paints the sky in golden and purple hues, the volcanic peaks and surrounding mist create an unforgettable scene. Arriving early ensures you can secure the best vantage point and capture the magical transformation from darkness to daylight.
Dealing with Midday Lighting Challenges in Harsh Sunlight
When the sun rises higher, the light becomes much stronger and shadows turn harsh. During this time, photographing Bromo can be tricky because details may appear washed out or overexposed. However, this period is great for experimenting with black-and-white photography, strong contrasts, or using filters to manage brightness.
Embracing the Soft Glow of the Afternoon Golden Hour
Late afternoon offers a softer, warmer light that beautifully highlights the textures of the volcanic landscape. Shadows stretch across the sand, giving depth to your shots. This is also an ideal time to capture people, horse riders, or temples, as the gentle tones flatter both the environment and human subjects.
Exploring Nighttime and Astrophotography Opportunities
The dry season brings clear, starry nights—perfect for astrophotography. From capturing the Milky Way arching above the volcano to experimenting with long exposures, nighttime photography allows you to showcase Bromo’s beauty in a completely different way.
Read more – Mount Bromo Milky Way Photography: How to Get Stunning Shots
Essential Photography Gear to Bring for Capturing Mount Bromo in the Dry Season
Choosing the Right Camera Body for Flexibility and Control
While modern smartphones can take impressive shots, bringing a DSLR or mirrorless camera offers far greater creative control. The ability to switch lenses, adjust settings quickly, and shoot in RAW format makes a big difference when capturing Bromo’s dramatic lighting. A weather-sealed camera body is especially useful since the dry season can be dusty, and volcanic ash often drifts through the air.
Selecting the Best Lenses for Different Perspectives
Wide-angle lenses (10–24mm or similar) are perfect for capturing sweeping landscapes, volcanic craters, and the vast Sea of Sand. Meanwhile, a telephoto lens (70–200mm or longer) helps you zoom in on details such as smoke plumes, textures on Mount Batok, or Tenggerese horse riders moving across the desert. A versatile zoom lens can also be handy if you want to travel lighter.
Stabilizing Your Shots with a Reliable Tripod
A sturdy tripod is essential for shooting in low light, during sunrise, or when attempting long exposure photography at night. Since the sand can be loose, opt for a tripod with wide or spiked feet to ensure stability. This tool is also invaluable for astrophotography, allowing you to capture sharp star trails or the Milky Way without camera shake.
Using Filters to Enhance Light and Color Control
Filters are lifesavers in Bromo’s challenging lighting conditions. A polarizing filter reduces glare and deepens the blue of the sky, making sunrise colors pop. Neutral density (ND) filters allow you to slow down your shutter speed in bright daylight, which is perfect for creating dreamy effects with clouds or mist. Graduated ND filters help balance the brightness between the sky and darker foreground.
Protecting Your Gear from Dust and Volcanic Ash
The dry season means dusty winds, especially around the Sea of Sand. Bring lens cloths, air blowers, and dustproof covers to protect your equipment. Zip-lock bags or camera rain covers also work well to shield your gear while traveling on a jeep or horse. Don’t forget a microfiber cloth to keep your lenses spotless.
Carrying Extra Batteries and Memory Cards for Long Shooting Days
Cold mornings at high altitude can drain batteries faster than usual. Always pack extras to avoid missing key moments like sunrise or star photography. Similarly, carry multiple memory cards—shooting in RAW consumes a lot of storage, and you’ll want the freedom to capture without constantly deleting files.
Choosing the Right Camera Settings
ISO, Aperture, Shutter Speed
Stick to a low ISO (100–200) for sharp, noise-free images. Use a wide aperture for portraits and a narrow one (f/8–f/16) for landscapes.
Manual vs. Automatic Mode
Manual mode gives you full control over exposure, while aperture priority mode is handy for quick adjustments.
Top Viewpoints for Dry Season Photography Around Mount Bromo
Penanjakan Hill – The Classic Sunrise Panorama
Penanjakan Hill is the most famous and iconic viewpoint at Mount Bromo. From here, you can witness the breathtaking panorama of Mount Bromo, Mount Batok, and Mount Semeru towering in the background. During the dry season, the sky is usually clear, giving photographers a perfect chance to capture the golden sunrise casting its first light over the volcanic peaks. Although it’s popular and can get crowded, the view is undeniably worth it, and it’s the safest choice for guaranteed stunning shots.
King Kong Hill – A Less Crowded Alternative with Stunning Angles
Just a short distance from Penanjakan, King Kong Hill offers equally dramatic views but with fewer tourists. It provides a slightly different angle, allowing you to photograph Bromo’s crater and surrounding landscapes without being overwhelmed by crowds. The dry season enhances visibility, letting you capture the fine details of the volcanic ridges and the rolling mist in the caldera below.
Love Hill (Bukit Cinta) – A Peaceful Spot with Wide-Angle Views
Love Hill is another fantastic viewpoint that offers a calmer atmosphere, perfect for those who want to avoid the busy sunrise crowd. From here, the sweeping view includes not only Bromo but also the surrounding valleys and rugged terrain. In the dry season, with clear air and soft golden light, Love Hill is ideal for wide-angle shots that capture the scale and serenity of the Tengger massif.
Sea of Sand Perspective – Getting Up Close with the Volcanic Desert
For a completely different experience, head down to the Sea of Sand that stretches around Mount Bromo. This vast, barren desert creates a dramatic foreground for your shots, especially when photographing horse riders, jeeps, or the temple that stands resiliently in the middle of the sands. The dry season accentuates the texture of the volcanic ash and the long shadows cast across the plain, giving your images a raw, cinematic feel.
Creative Composition Techniques for Stunning Mount Bromo Photography
Applying the Rule of Thirds for Balanced and Engaging Shots
One of the simplest yet most effective techniques is the rule of thirds. By dividing your frame into a 3×3 grid and placing key subjects—like Bromo’s smoking crater, the rising sun, or a horse rider—along the gridlines, your images immediately feel more balanced and visually appealing. At Bromo, this technique works beautifully for sunrise shots, where you can place the glowing sky in the upper third and the volcanic landscape in the lower portion, creating harmony between earth and sky.
Using Leading Lines from the Natural Landscape
Bromo’s dramatic terrain is full of natural lines that can guide the viewer’s eyes deeper into your photo. Paths winding through the Sea of Sand, ridges curving around the crater, or even the way the morning mist drifts across the valley can all act as leading lines. During the dry season, the clarity of the landscape enhances these elements, making them excellent tools for drawing attention to your main subject.
Framing with Foreground Elements to Add Depth
Rather than just pointing your camera at the volcano, include something in the foreground to frame your shot. This could be the silhouette of a Tenggerese horseman, a jeep waiting in the desert, or even grasses and shrubs on the hills. Foreground framing creates layers in your composition, adding depth and making the viewer feel like they’re stepping into the scene.
Playing with Scale to Show Vastness and Grandeur
Mount Bromo’s landscape is immense, and one way to communicate that scale is by including small human figures, horses, or vehicles in your photos. A single person walking across the Sea of Sand against the backdrop of towering volcanoes instantly tells a story of how grand and overwhelming nature is compared to human presence. This technique works particularly well in the dry season when the skies are clear and details are sharp.
Experimenting with Symmetry and Minimalism for Unique Perspectives
Sometimes less is more. Instead of filling your frame with multiple subjects, try a minimalist approach—such as photographing a lone horse against the endless sand dunes, or the volcano centered in perfect symmetry under a glowing sunrise. The dry season’s crisp atmosphere and clear horizons make it easier to experiment with such clean and striking compositions.
Capturing the Sunrise at Mount Bromo
Arriving Early to Secure the Best Vantage Point
Sunrise at Mount Bromo is world-famous, which means the viewpoints get crowded very quickly, especially in the dry season when skies are clear and tourists flock in larger numbers. To capture the best angles, it’s essential to arrive at least one hour before sunrise. This extra time not only ensures you find a good spot but also allows you to set up your tripod, check your camera settings, and get comfortable in the chilly mountain air. Early arrival also gives you the chance to capture the transition from night to dawn, including the deep blue hour just before the sun rises.
Adjusting Exposure for Dynamic and Changing Light Conditions
The sunrise at Bromo is not a single moment but a sequence of constantly shifting light. As the sun begins to rise, the sky glows in shades of purple, orange, and pink, while the volcanic peaks remain in shadow. Moments later, golden light spills across the Sea of Sand, highlighting the ridges and textures of the crater. These rapid changes require quick adjustments in exposure. Using exposure bracketing or HDR techniques helps balance the contrast between the bright sky and the darker landscape, ensuring none of the details are lost.
Long Exposure Photography Tips for Mount Bromo in the Dry Season
Creating Silky Clouds and Mist for a Dreamlike Effect
One of the most rewarding uses of long exposure at Bromo is capturing the movement of clouds and mist. In the early morning, a blanket of fog often drifts across the Sea of Sand, and with a slow shutter speed, this mist transforms into a soft, silky layer that looks almost otherworldly. Similarly, fast-moving clouds above the crater can be blurred into smooth streaks, adding motion and drama to your images. To achieve this, use a tripod for stability, set your shutter speed to several seconds, and experiment until you find the right balance between softness and detail.
Star Photography Under the Clear Dry Season Sky
The dry season is a dream for astrophotographers, as the sky is usually free of clouds and light pollution is minimal around Bromo. Long exposures allow you to capture the brilliance of the Milky Way arching above the volcano or even create star trail photos that circle dramatically around the night sky. Use a wide-angle lens with a large aperture (f/2.8 or wider) and set your shutter speed between 15–30 seconds for crisp stars. For trails, go longer or stack multiple exposures in post-processing. Bringing a remote shutter release will help prevent camera shake during these long exposures.
Dealing with Harsh Sunlight in the Dry Season
Using ND Filters to Control Brightness and Exposure
In the dry season, the sunlight at Mount Bromo can be extremely intense, especially after mid-morning. This makes it difficult to achieve balanced exposures without parts of your photo becoming washed out. Neutral Density (ND) filters act like sunglasses for your camera, reducing the amount of light that enters the lens. This allows you to shoot with slower shutter speeds or wider apertures without overexposing your image. They’re especially helpful if you want to create long exposures of moving clouds or people in broad daylight while still keeping the overall composition properly lit.
Finding Shade and Adjusting Shooting Angles for Softer Light
When the sun is high and harsh, one of the simplest tricks is to look for shaded areas or adjust your shooting angle. For example, photographing with the sun behind you can eliminate strong flares and reduce extreme contrasts. Positioning yourself at different angles relative to the sun changes how shadows fall across the volcanic landscape, which can help create more flattering textures. Even small adjustments, like kneeling lower or moving to the side of a ridge, can soften the overall effect of harsh midday light.
Adding a Human Element to Your Shots
Local Tenggerese People
The Tenggerese community often wears traditional attire, adding cultural depth to your images.
Horse Riders in the Desert
Capturing horsemen crossing the sand adds a sense of scale and storytelling.
Common Mistakes to Avoid in Dry Season Photography
Overexposing Skies and Losing Sunrise Colors
One of the biggest mistakes at Mount Bromo during the dry season is letting the bright skies blow out your photo. Since the sun rises fast and the air is clearer, the light can be much stronger than expected. Without proper settings, your camera may capture a plain white sky instead of the dramatic orange, pink, and purple hues. To avoid this, always check your histogram, use exposure compensation, or bracket your shots for later blending in post-processing. Filters like a graduated ND can also help balance the brightness between the sky and the darker volcanic landscape.
Neglecting Gear Protection Against Dust and Ash
The dry season means the Sea of Sand is at its dustiest. Winds can whip up volcanic ash that easily gets into lenses, sensors, and camera buttons. A common mistake is underestimating how damaging this can be to equipment. Photographers often forget to bring protective covers, lens hoods, or even simple zip bags to shield gear while moving through the desert. Always clean your lenses and camera body with a blower after each shoot, and never change lenses in the middle of the dusty plains.
Ignoring Composition in Favor of “Postcard Shots”
With such a stunning landscape, it’s easy to point your camera toward the volcano and click away. But this leads to generic “tourist” photos that lack personality. A mistake many make is forgetting to experiment with composition—adding foreground subjects, using leading lines, or capturing unique angles. Instead of only chasing the classic postcard view, challenge yourself to frame Bromo creatively, making your work stand out from the thousands of similar images online.
Relying Too Much on Automatic Camera Settings
Another common error is leaving the camera in full automatic mode. In Bromo’s tricky light—strong sun, deep shadows, mist—automatic settings often fail to capture the scene correctly. For example, the camera might overcompensate for brightness and darken your landscape too much, or it might fail to preserve color details during sunrise. Switching to manual or semi-manual modes like aperture priority gives you far more control and allows you to adjust settings for the dramatic light changes in real time.
Forgetting Practical Preparation for Shooting Conditions
Many photographers arrive at Bromo without considering the physical challenges of shooting in the dry season. They forget essentials like warm clothing for chilly dawns, plenty of water to stay hydrated, and masks or scarves to protect from dust. Without these, you may cut your shooting time short because you’re uncomfortable or unprepared. Always treat photography at Bromo as both an adventure and a shoot—be ready for the environment so you can focus fully on your craft.
Practical Travel Tips for Photographers
Best Months to Visit
June to August has the clearest skies, though it’s also peak season.
Transport and Accessibility
Jeeps are the most common transport option to reach viewpoints. For adventurers, hiking gives unique perspectives.
Staying Safe in Dry Conditions
Carry water, protect yourself from dust with a scarf, and pack layers since mornings are chilly.
Also learn: Bromo Trip Guide: Explore Majestic Mount Bromo
Conclusion
Photography at Mount Bromo in the dry season is nothing short of magical. With clear skies, golden light, and vast landscapes, it’s the perfect setting for photographers to unleash their creativity. By preparing the right gear, choosing the best viewpoints, and mastering light control, you’ll be ready to capture images that tell unforgettable stories of this volcanic wonder.
Also read: Bromo Photography: A Guide to Capture the Magic of Mount Bromo
FAQs
1. What is the best month for photography at Mount Bromo?
June to August are the clearest, though May and September also offer great conditions with fewer crowds.
2. Do I need a professional camera for Bromo photography?
Not necessarily. A good smartphone with manual controls can capture stunning shots, though DSLRs and mirrorless cameras offer more flexibility.
3. Can I capture the Milky Way at Bromo during the dry season?
Yes! The clear skies of the dry season are perfect for astrophotography.
4. How early should I arrive for sunrise photography?
At least one hour before sunrise to secure a good spot, especially at popular viewpoints like Penanjakan.
5. Is the dry season very dusty at Bromo?
Yes, the wind can carry volcanic dust. Always protect your camera gear with covers and clean lenses regularly.
[…] Also read : Bromo photography in the Dry Season: The Best Tips […]
[…] to understand the region’s weather patterns. Mount Bromo experiences two main seasons — the dry season (May to October) and the rainy season (November to April). During the dry months, the skies are […]
[…] The dry season is widely recognized as the best time to visit Mount Bromo. Between April and October, rainfall is minimal, making trails easy to navigate and viewpoints more accessible. The air is crisp and cool, and the sky often glows in deep shades of orange and purple during sunrise. This period is ideal for photographers, hikers, and anyone who wants to witness the volcano’s raw beauty without weather interruptions.However, because of its popularity, expect larger crowds—especially from July to September, when local and international tourists flock to Bromo. To secure a good spot for sunrise, it’s best to arrive early or even spend the night nearby in Cemoro Lawang or Sukapura. […]
[…] The dry season, from May to October, is widely considered the best time to embark on your Bromo adventure. During these months, the sky is typically clear, the sunrise is more vibrant, and the trails are dry and easy to navigate. The absence of heavy fog and rain means your Jeep can travel smoothly across the Sea of Sand and steep hills without risk. Photographers especially love this season because the golden sunrise over Mount Bromo is rarely obstructed by clouds. Early mornings are chilly but crisp, offering perfect visibility from popular viewpoints like King Kong Hill and Penanjakan. […]
[…] Look for jackets with adjustable hoods, multiple pockets, and ventilation zippers for comfort. During the dry season, dust storms can occur, so wearing a lightweight outer shell also keeps volcanic ash away from your […]
[…] your trip to Bromo is crucial for the best experience. The dry season from May to October is ideal, as you’ll enjoy clear skies and spectacular sunrise views. The wet […]
[…] Also read: Bromo photography in the Dry Season: The Best Tips […]