Introduction
There’s something magical about watching the sun slowly rise over Mount Ijen in East Java, Indonesia. The soft golden light spilling across the rugged volcanic landscape creates a breathtaking view that every photographer dreams of capturing. But Ijen is no ordinary mountain—it’s home to the famous turquoise crater lake and the mesmerizing blue fire phenomenon. If you’re planning to capture ijen sunrise photography, preparation is key. With the right tips and equipment, ijen sunrise photography can reward you with images that tell a story of beauty, mystery, and adventure.
Why Mount Ijen is a Sunrise Photographer’s Dream
The Unique Charm of Ijen Crater
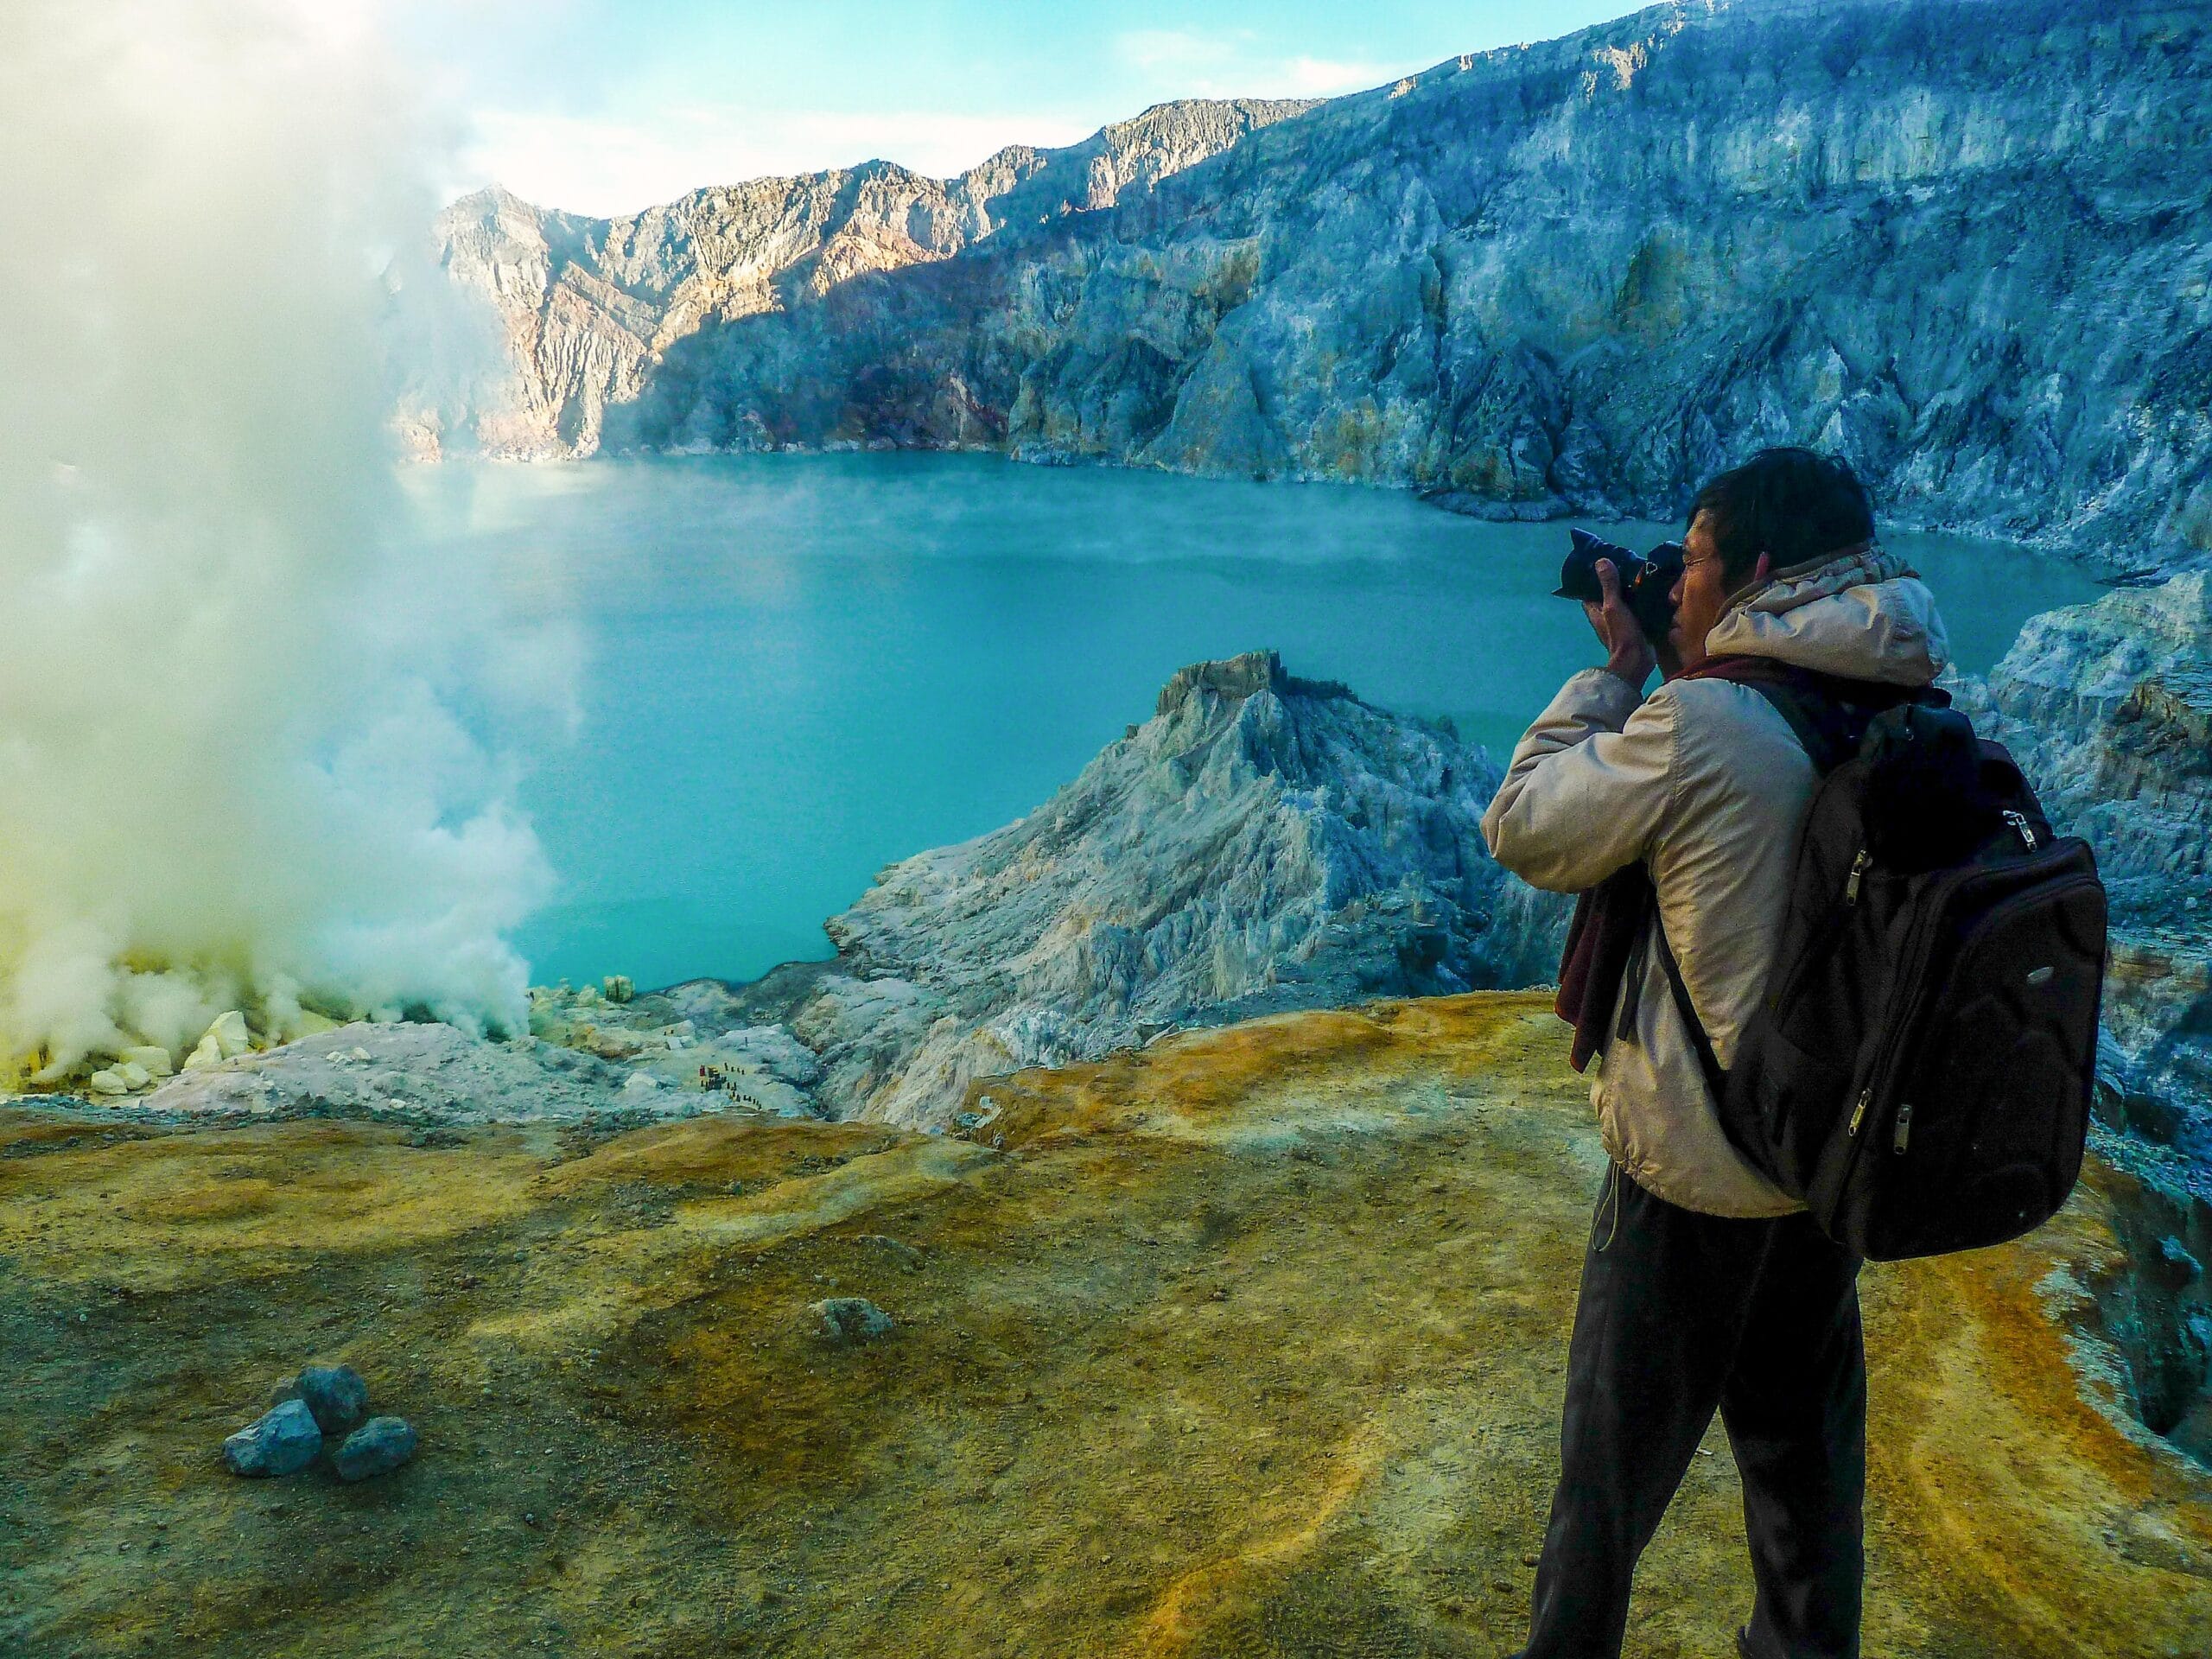
Mount Ijen isn’t just another volcano—it’s one of the most photogenic natural wonders in Indonesia. The massive crater lake, often shrouded in mist, reflects the morning hues of the sky in stunning colors. Add in the rugged crater walls and sulfur miners silhouetted against the sunrise, and you’ve got endless photo opportunities.
Why Sunrise at Ijen is Special
Unlike many other mountains, sunrise at Ijen combines the beauty of golden skies with the drama of volcanic terrain. As the first rays of light touch the crater, shadows dance across the ridges, creating depth and texture in your photos. It’s a perfect blend of tranquility and raw natural energy.
Best Time to Visit for Sunrise Photography
Seasonal Considerations
The best time to shoot sunrise at Ijen is during the dry season, from April to October. The skies are clearer, giving you the perfect golden hour glow. During the rainy season, clouds and mist often block the view.
Ideal Months for Clear Skies
July, August, and September are especially great months to capture stunning sunrises. The chances of fog are lower, and visibility is at its best.
Planning Your Trip to Ijen
Permits and Entry Fees
Foreign visitors need to pay an entry fee of around IDR 100,000 on weekdays and slightly higher on weekends. Always carry cash, as card payments aren’t accepted at the gate.
Local Guides and Their Importance
Hiring a local guide not only helps you navigate the dark trails safely but also gives you insider tips on the best photo spots. Many guides are also familiar with photography-friendly angles.
Essential Gear for Ijen Sunrise Photography
Camera and Lens Recommedations
A DSLR or mirrorless camera with wide-angle and telephoto lenses is ideal. A wide-angle lens captures the vastness of the crater, while a telephoto lens lets you zoom in on details like the miners or crater lake.
Tripod, Filters, and Accessories
A sturdy tripod is a must for low-light conditions. Neutral density (ND) filters help balance exposure, while a polarizer enhances the sky’s colors. Don’t forget spare batteries—they drain quickly in cold temperatures.
Also read: Drone photography at ijen sunrise: How to get incredible shots
Clothing and Personal Essentials
Dressing for Cold Temperatures
At 2,799 meters, Ijen gets cold—especially before sunrise. Layer up with a thermal base, a warm jacket, gloves, and a beanie. Comfortable hiking shoes are a must.
Safety Gear for Trekking
Bring a gas mask to protect yourself from sulfur fumes, and carry a flashlight or headlamp for the early morning hike.
The Trek to Ijen Crater
What to Expect on the Trail
The trek to Mount Ijen crater is an adventure in itself. Starting from the Paltuding base camp, the trail spans about 3 kilometers with varying terrain—steep in sections, relatively flat in others. Most of the climb takes place in darkness, as hikers usually begin around 1:00–2:00 AM to reach the rim before sunrise. Along the way, you’ll walk through forested paths, dusty volcanic soil, and rocky stretches. The silence of the night, combined with the occasional sound of footsteps and distant sulfur activity, creates a surreal atmosphere that heightens the anticipation of what’s to come.
Fitness Preparation Tips
Although not overly technical, the trek can be challenging if you’re not accustomed to hiking. A moderate level of fitness will make the journey more comfortable. To prepare, take regular walks or hikes in the weeks leading up to your trip, focusing on endurance and leg strength. Good cardiovascular stamina is helpful too, as the thin air near the crater rim can make breathing slightly harder. Don’t rush—pace yourself and take short breaks to preserve energy for your photography session at the top.
Additional Tips for the Trek
- Carry at least 1–2 liters of water to stay hydrated.
- Bring a small snack like energy bars for an early-morning boost.
- Use a headlamp instead of a flashlight to keep your hands free for balance and photography gear.
Reaching the Best Sunrise Spots
Panoramic Viewpoints
Once you reach the crater rim, the most popular viewpoint lies near the edge overlooking the turquoise lake. This wide, open vantage point gives you a sweeping panorama of the volcanic landscape, including distant Mount Merapi on clear days. The first rays of sunrise stretch across the horizon here, bathing the crater in golden hues that photographers love.
Hidden Photo Spots Around the Crater
If you’re willing to explore beyond the crowd, you’ll discover less-traveled spots along the rim. Some areas offer unique foregrounds—such as jagged rock formations or twisted trees—that add character to your composition. Moving slightly away from the main viewpoint also means fewer distractions and more space to set up your tripod.
Alternative Angles for Creativity
Don’t limit yourself to one perspective. Try positioning yourself lower on the rim to capture silhouettes of hikers above, or frame your shot to include both the lake and sulfur miners below. A telephoto lens can also isolate fascinating details, like steam rising from vents or sunbeams cutting through morning mist.
Also read: Ijen Sunrise Viewpoint – Best Sunrise Experience at Mount Ijen
Camera Settings for Sunrise Shots
ISO, Aperture, and Shutter Speed
To balance light and clarity during sunrise, keep your ISO between 100–400 to reduce noise. Aperture settings between f/8–f/11 usually work best for landscape sharpness. As for shutter speed, experiment with slower exposures in the early dawn when light is low, then adjust to faster speeds as the sun rises. Always check your histogram to avoid underexposed foregrounds or overexposed skies.
White Balance and Focus Tips
Set your white balance to “Daylight” for natural tones, or experiment with “Cloudy” to warm up the scene. Since autofocus can struggle in dim pre-dawn light, consider using manual focus to lock onto clear edges like crater ridges.
Bracketing and RAW Shooting
For sunrise photography, light can shift dramatically within minutes. Bracketing—taking multiple exposures at different settings—ensures you capture details in both shadows and highlights. Always shoot in RAW format to give yourself more flexibility in post-processing.
Practical Tips
Use a remote shutter release or timer to prevent camera shake.
Enable long-exposure noise reduction if shooting extended exposures.
Keep an eye on condensation if the morning is misty—carry a lens cloth.
More tips: Best Camera Settings for Ijen Sunrise Shots
Long Exposure Photography at Ijen
Capturing the Soft Morning Light
Long exposure photography is one of the most rewarding techniques at Ijen. By extending your shutter speed, you can capture dreamy effects—clouds drifting across the crater, mist swirling gently, or even soft reflections on the lake’s surface. These shots create a magical, ethereal feel that goes beyond what the naked eye sees.
Using Filters for Creative Shots
Graduated ND filters are particularly useful at sunrise, as they balance the brightness of the sky with the darker foreground. A polarizing filter also helps reduce glare and deepen sky colors. For longer exposures, consider stacking ND filters to achieve shutter speeds of several seconds or more, especially when light increases after dawn.
Creative Approaches with Long Exposure
- Silhouettes in Motion: Capture hikers walking along the rim as blurred figures against a sharp background.
- Light Trails: If you start shooting while hikers are still ascending, headlamps can create light trails that add storytelling elements.
- Water-like Clouds: Slow shutter speeds make drifting fog or clouds resemble smooth, flowing water—a unique effect in volcanic landscapes.
Technical Tips for Success
- Start with shutter speeds around 5–15 seconds before the sun rises.
- Use a sturdy tripod to avoid any movement.
- Cover your viewfinder to prevent light leaks during long exposures.
Also read: Night Photography at Bromo: A Complete Guide for Stunning Shots
Composing Stunning Sunrise Frames
Rule of Thirds at Ijen Crater
When composing your Ijen sunrise photography, always remember the rule of thirds. Place the horizon either in the upper or lower third of your frame rather than the center. This gives a sense of balance and helps highlight either the dramatic skies or the rugged foreground. By aligning the crater edges or the glowing horizon along these gridlines, your photo instantly feels more professional and intentional.
Framing Mount Merapi in the Background
On a clear morning, Mount Merapi can be seen in the distance, adding another layer of depth to your composition. Positioning Merapi as a background subject draws the eye deeper into your photo. Try experimenting with wide-angle shots that include both the crater lake in the foreground and Merapi rising in the distance—it creates a dramatic story in a single frame.
Experimenting with Angles and Perspectives
Don’t just stick to one angle. Move around the crater rim to discover fresh compositions. Kneel down for low perspectives that highlight foreground details, or climb slightly higher to capture expansive panoramic shots. Tilting your camera upward also emphasizes the vastness of the sky, making sunrise feel even more powerful.
Incorporating Foreground Interest
Silhouettes of Hikers
One of the best ways to add storytelling to your Ijen sunrise photography is by including hikers as silhouettes. The human figures create scale, reminding viewers just how vast the crater is. Position them against the rising sun, and you’ll capture dramatic outlines that make your shot feel alive and adventurous.
Crater Edges and Sulfur Miners
The rugged crater edges themselves are natural subjects. Their jagged lines guide the eye across your frame, adding structure to your photo. Additionally, including sulfur miners in your shot can capture the human element of Ijen, showing the connection between people and this powerful landscape. Their presence also adds authenticity and emotion to your photos.
Natural Elements as Anchors
Foreground details like twisted tree branches, volcanic rocks, or even steam vents can act as anchors for your composition. They provide depth and a sense of place, leading the viewer’s eyes from the front of the photo to the horizon.
Editing Your Ijen Sunrise Photos
Post-Processing Essentials
Raw sunrise photos can sometimes look flat compared to how magical the scene felt in person. Post-processing helps bring that magic back. Start by adjusting exposure—lift shadows to reveal crater details and pull down highlights to recover the sky’s colors. Adding a touch of contrast will make your images pop.
Enhancing Colors While Keeping It Natural
The temptation to oversaturate sunrise colors is real, but restraint leads to more professional results. Slightly enhance the oranges, pinks, and blues, but keep tones realistic. The turquoise lake at Ijen already looks surreal—exaggerating it may make your photo appear artificial.
Advanced Touches for Impact
Use gradient filters in editing software to balance the sky and land tones. Sharpen crater textures, and add subtle clarity for definition. If you captured silhouettes, a small boost in contrast enhances their drama against the soft sunrise background.
Common Mistakes to Avoid
Overexposure and Blown-Out Skies
One of the most common issues in Ijen sunrise photography is losing detail in the bright sky. Always check your histogram and use exposure bracketing if necessary. It’s easier to recover details in shadows than in overexposed highlights.
Rushing Without Composing Shots
After the trek, many photographers rush to snap pictures, forgetting about composition. Take a moment to breathe, scan the scene, and thoughtfully frame your shots. Quality always beats quantity.
Forgetting Foreground Interest
A beautiful sky alone can look flat. Without foreground elements like rocks, crater ridges, or human figures, your photo may lack depth. Always try to include something in the foreground.
Not Shooting in RAW Format
JPEGs limit your ability to fix exposure and colors later. Shooting in RAW gives you full control in post-processing, which is especially useful when handling the extreme light contrasts at sunrise.
Ignoring Stability and Tripod Use
Blurry photos are often the result of shaky hands in low light. Always use a tripod and, if possible, a remote shutter release. Even a slight shake can ruin a once-in-a-lifetime sunrise shot.
Safety Tips for Sunrise Photography
Handling Toxic Gas Around Ijen
Stay upwind of sulfur smoke, and always wear your gas mask if fumes drift your way.
Trekking Safety at Night
Stick with your group, use your headlamp, and avoid wandering near steep crater edges.
Beyond Sunrise: Exploring More of Ijen
Capturing the Blue Fire Phenomenon
Before sunrise, you can photograph the rare blue fire caused by ignited sulfur gases—a once-in-a-lifetime shot.
Daytime Photography Opportunities
After sunrise, don’t pack away your camera. The turquoise crater lake and miner activity make for great daytime shots.
Conclusion
Capturing ijen sunrise photography is more than just clicking a camera—it’s an unforgettable journey into nature’s raw beauty and power. With patience, planning, and creativity, ijen sunrise photography allows you to frame the golden skies, dramatic crater views, and human stories of Ijen in their most breathtaking form. Whether you’re a beginner or a seasoned professional, Mount Ijen will always give you something extraordinary to bring home in your lens.
FAQs
1. What time should I start hiking to catch the Ijen sunrise?
Start around 1:00–2:00 AM so you reach the crater rim before sunrise at around 5:30–6:00 AM.
2. Do I need a guide to hike Ijen for sunrise photography?
It’s not mandatory, but highly recommended for safety and to find the best viewpoints.
3. Is it safe to photograph near the crater lake?
Yes, but stay on marked trails and wear a gas mask if fumes are strong.
4. Can beginners capture great photos at Ijen?
Absolutely—practice basic settings and focus on composition for amazing results.
5. What’s the biggest challenge in Ijen sunrise photography?
Managing sulfur fumes, the steep trek, and the cold early-morning conditions.

[…] to how stars appear in the night sky — always burning, but only visible when darkness falls. The Ijen crater’s high sulfur content and consistent volcanic activity make it one of Earth’s most unique natural […]
[…] midnight. As dawn approaches, sunlight gradually overpowers the glow, making it vanish before the Ijen Sunrise begins. This fleeting moment adds to its mystery — a natural light show that few places in the […]
[…] are safer, and visibility of the famous blue flames is much better. The dry season also offers stunning sunrise views from the crater rim, where you can witness the turquoise acidic lake glowing beneath the morning […]
[…] for storytelling flair in Drone Photography at Ijen Sunrise, use a pull-away shot that starts close to the crater and then ascends or reverses to reveal the […]