Introduction
Bromo crater photography – If you’ve ever dreamed of capturing a landscape that feels like it belongs on another planet, Mount Bromo should be at the top of your list. Located in East Java, Indonesia, Bromo crater photography is one of the most dramatic volcanic features in the world. With smoke constantly rising from its depths, a surreal sea of sand surrounding it, and golden light at sunrise painting the scene, it’s no wonder photographers from across the globe make the journey here. But getting the perfect shot of the Bromo crater takes more than just pointing your camera—it requires timing, preparation, and the right techniques.
Understanding Mount Bromo’s Landscape
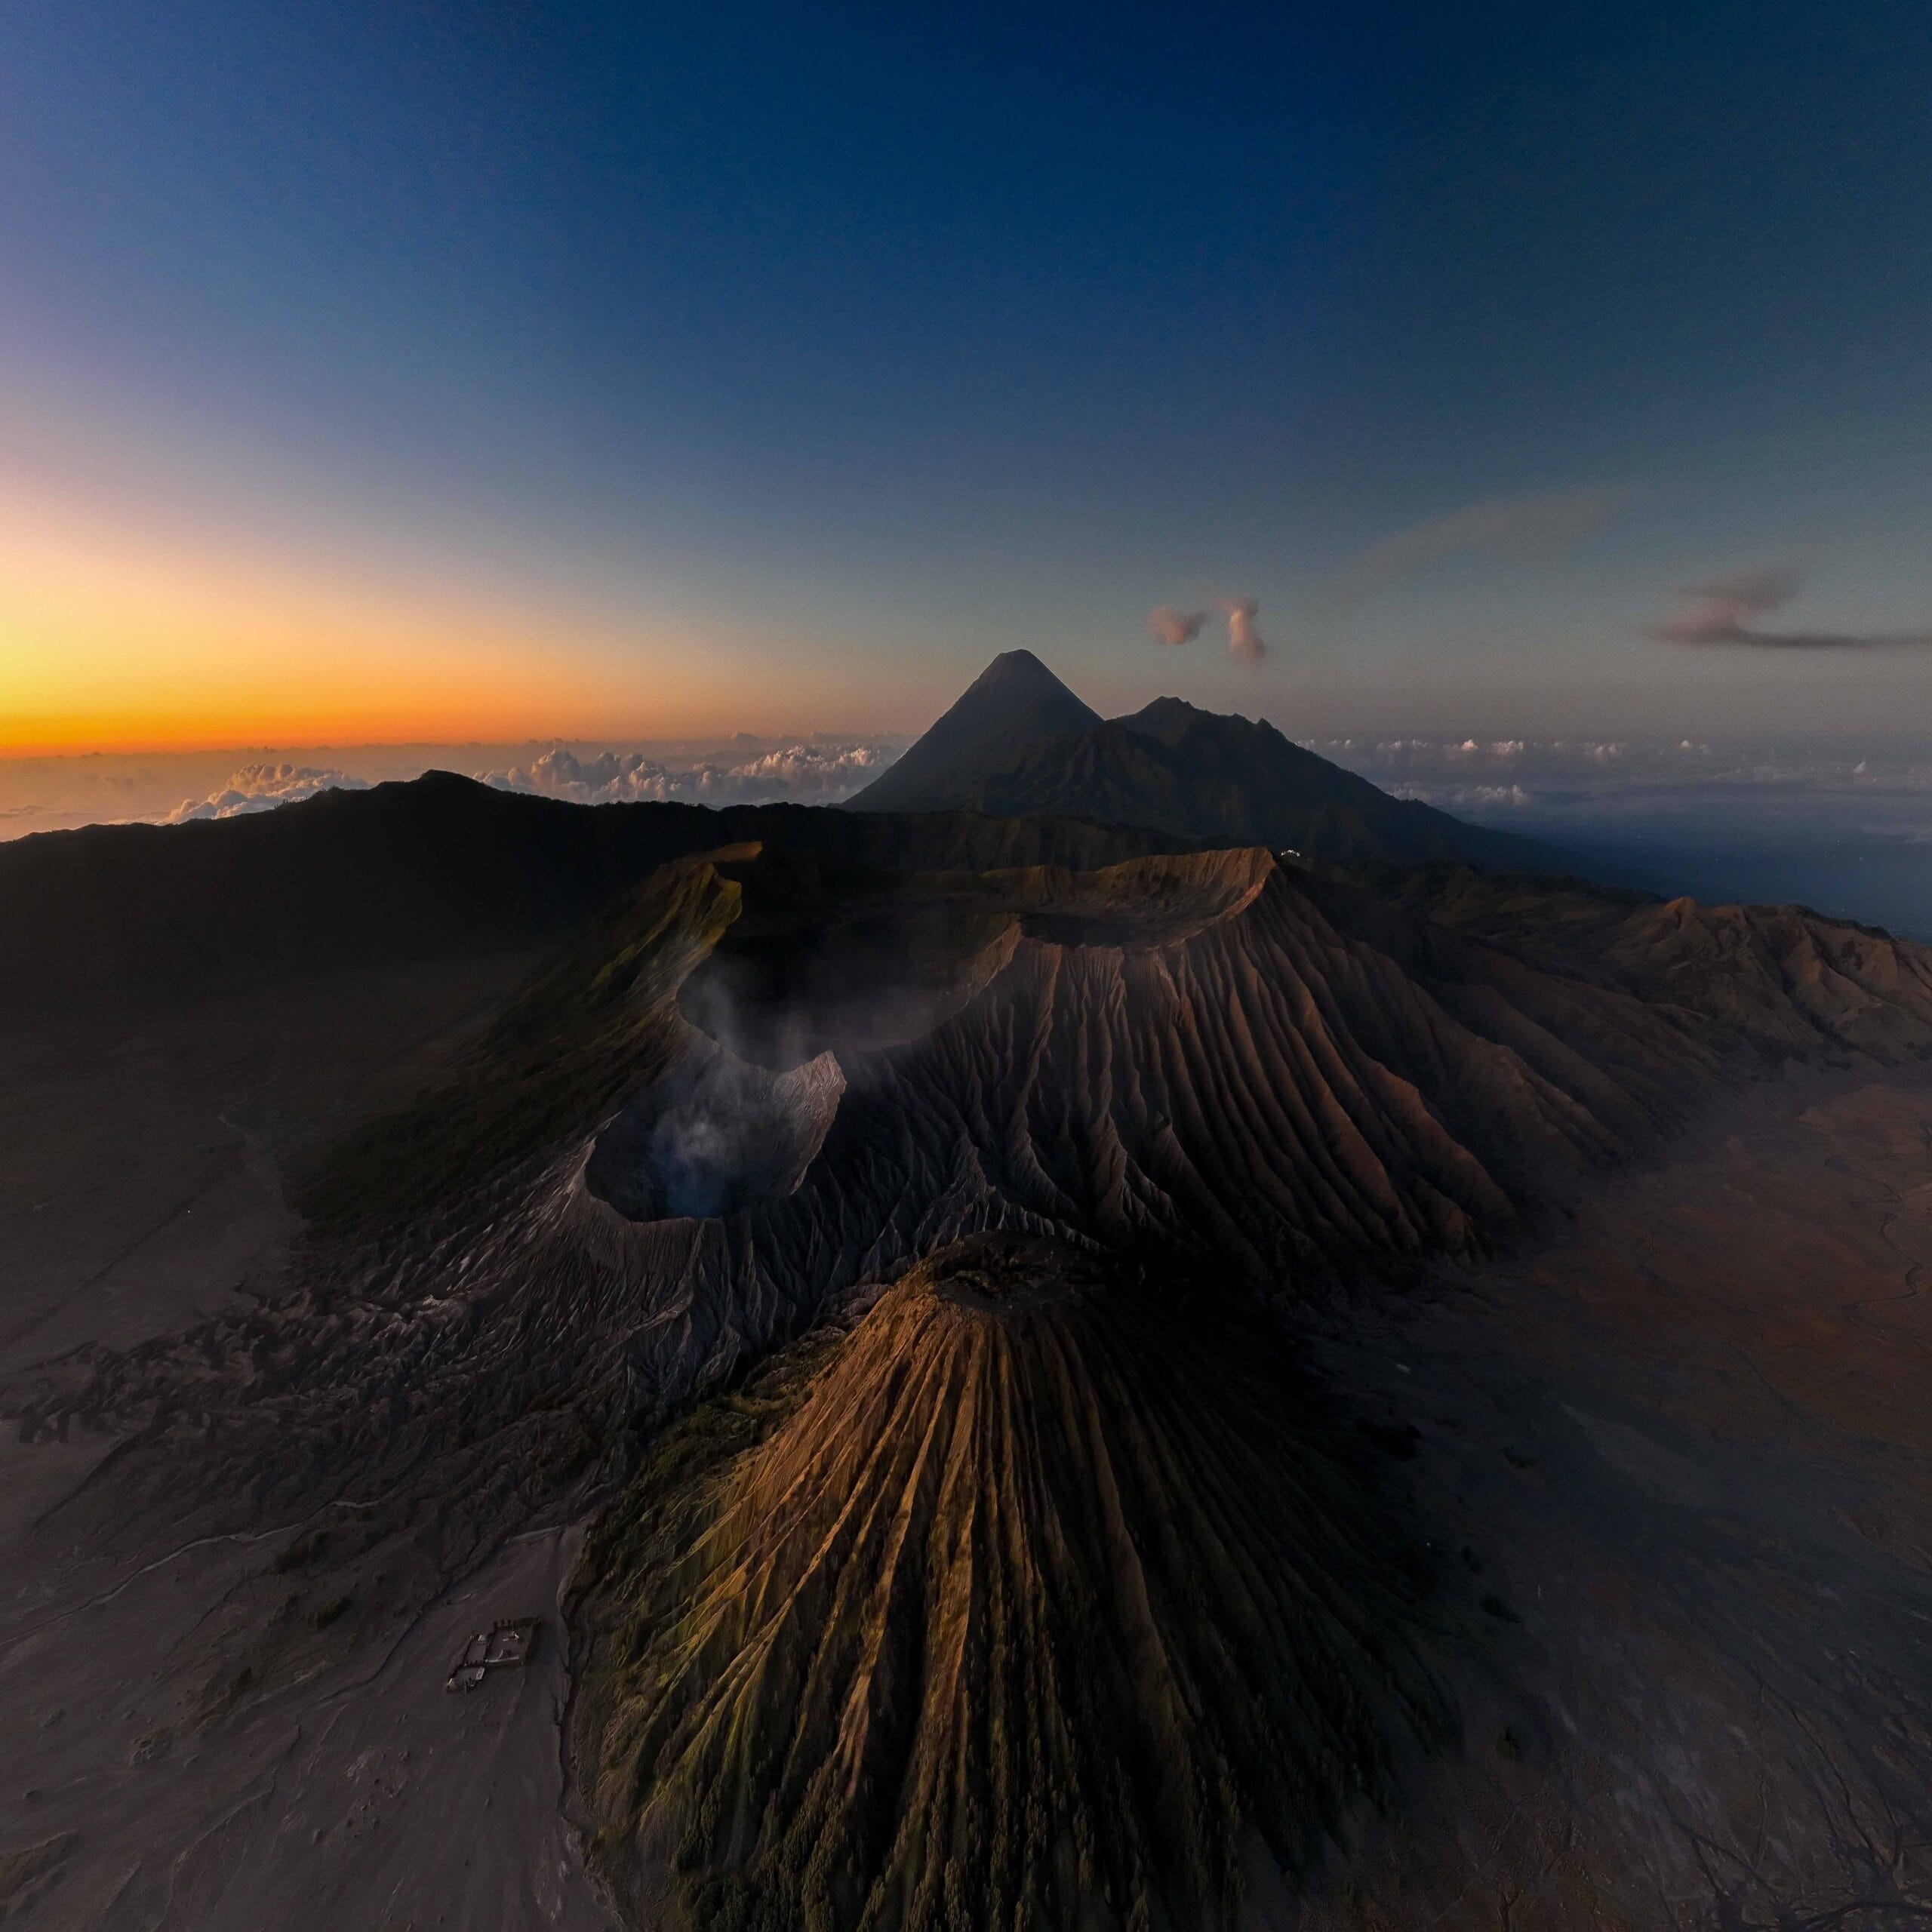
Mount Bromo sits in the middle of the Tengger Caldera, surrounded by a vast desert-like plain called the “Sea of Sand.” This unique setting makes it stand out from other volcanoes in Indonesia. The crater itself is rugged, dramatic, and constantly active, with plumes of white smoke adding mystery to every shot. Unlike dense jungles or cluttered peaks, the openness of Bromo gives photographers plenty of room to experiment with angles and framing.
Best Time to get Bromo crater photography
Sunrise Magic : When Nature Puts on Its Greatest Show
The moment the first rays of sunlight break through the horizon is when Mount Bromo truly comes alive for photographers. At sunrise, the soft golden light spills over the caldera, illuminating the smoke rising from the crater and casting dramatic shadows across the Sea of Sand. This natural spotlight effect creates depth, contrast, and mood in your photos that simply cannot be replicated later in the day. The cool morning air often brings a touch of mist, which adds a mysterious layer to your images. Arriving before dawn ensures you don’t miss those fleeting minutes when the landscape glows in a way that feels almost surreal.
Golden Hour vs. Blue Hour: Choosing Between Warm Drama and Cool Serenity
Golden hour, the short period just after sunrise, bathes the entire landscape in warm tones, turning the volcanic slopes a glowing orange and emphasizing the rugged textures of the crater. This is the time for photos that radiate energy and vibrancy. On the other hand, blue hour—the period just before sunrise or after sunset—casts a cooler, softer light over Bromo. The scene takes on a calm, dreamlike atmosphere, with shades of deep blue and violet dominating the sky. Both times offer distinct moods: golden hour for fiery drama and blue hour for tranquil mystery. Photographers who plan well often capture both, giving their portfolio a wide emotional range.
Seasonal Weather Considerations: Dry Skies vs. Mystical Fog
The season you choose to visit plays a big role in the quality of your photos. During the dry season, which runs from April to October, the skies are usually clear, offering crisp, unobstructed views of the crater and surrounding mountains. This is the best time if you’re looking for sharp, detailed landscape images with perfect visibility. However, the rainy season, from November to March, should not be underestimated. While it may bring cloudy skies and occasional downpours, it also adds atmospheric elements like rolling fog, low-hanging clouds, and dramatic storm light that can make your images look moody and cinematic. The unpredictability of the rainy season can be a challenge, but for creative photographers, it can also provide opportunities for shots that stand out from the typical sunrise postcards.
Essential Photography Gear for Bromo Crater
- Cameras and Lenses: A DSLR or mirrorless camera is ideal. Wide-angle lenses (14–24mm) capture the vastness, while telephoto lenses (70–200mm) isolate details.
- Tripods and Stabilizers: Essential for sunrise shots, long exposures, and ensuring sharpness.
- Filters and Accessories: ND filters for long exposures, polarizers for enhancing skies, and plenty of lens cloths to wipe away volcanic dust.
Read more : How to get stunning Milkyway photography shots
Choosing the Right Viewpoints
Penanjakan Viewpoint: The Classic Sunrise Angle Everyone Dreams Of
Penanjakan is the most famous and perhaps the most visited viewpoint around Mount Bromo—and for good reason. From here, you get that iconic postcard-perfect panorama of the entire Tengger Caldera, with Mount Bromo smoking in the foreground, Mount Batok’s symmetrical cone standing proudly beside it, and Mount Semeru rising tall in the distance. At sunrise, the layered colors of the sky gradually shift from deep purples to fiery oranges, casting soft light on the volcanoes and highlighting their textures. While it can get crowded, the sweeping, unobstructed perspective is worth the effort. For photographers, this is where you can capture that wide, dramatic shot that tells the full story of the Bromo landscape in a single frame.
King Kong Hill: A Less Crowded Spot with Equally Stunning Views
Just a short distance from Penanjakan lies King Kong Hill, a viewpoint that offers nearly the same sweeping vista but without the overwhelming crowds. Named after its rugged rock formation, this spot allows you to set up your tripod in relative peace and focus on perfecting your composition. From King Kong Hill, the view of the Sea of Sand, the steaming Bromo crater, and Mount Semeru in the background feels expansive and dramatic. The slightly different angle compared to Penanjakan often results in softer, less obstructed lighting, making it an excellent choice for those who want a cleaner, more balanced image. If you’re looking for a calmer atmosphere and still want world-class photos, this spot should be high on your list.
Love Hill: A Romantic Perspective of the Caldera
For a quieter and more intimate viewpoint, Love Hill (Bukit Cinta) offers a unique vantage point over the Bromo landscape. As its name suggests, it’s often favored by couples and travelers who want a more personal experience with the sunrise. From here, the view is slightly more distant than Penanjakan or King Kong Hill, but this distance actually creates a broader perspective of the caldera and its surrounding volcanoes. Photographs from Love Hill often feel more atmospheric, with the entire landscape appearing layered and vast. The tranquility of this spot also makes it easier to experiment with different compositions, like framing the scene with surrounding trees or including people in silhouette for scale and storytelling.
Crater Rim Perspective: Raw Drama from the Edge of the Volcano
For photographers who want to capture the raw power of Mount Bromo, standing right on the crater rim is an unforgettable experience. From this vantage point, you’re not just photographing the volcano—you’re inside its world. The thick smoke rising from the crater feels close enough to touch, and the textures of the jagged rim add drama and intensity to every shot. This perspective emphasizes the living, breathing nature of the volcano, making your images feel alive and powerful. However, photographing from the rim requires caution, as the terrain can be slippery and unstable. With the right preparation and safety measures, though, this viewpoint can deliver the most dramatic and immersive shots of Bromo’s volcanic energy.
Framing the Perfect Shot
Don’t just focus on the crater itself—use the vast sea of sand, nearby peaks, or even a lone horse rider as part of your composition. Framing the smoke plume against a glowing sunrise creates images that feel alive. Always look for ways to balance the light and shadow for maximum impact.
Playing with Light and Shadows
Bromo is a playground for light chasers. In the early morning, shadows stretch across the caldera, adding depth. Try experimenting with silhouettes, such as people or trees against the fiery sky. On full moon nights, the crater takes on an eerie glow that feels almost otherworldly.
Techniques for Dramatic Shots
Long Exposure Photography: Turning Movement into Magic
Long exposure is one of the most powerful tools you can use to create a sense of drama when photographing Mount Bromo. By keeping your shutter open for several seconds, you can transform fast-moving elements like drifting smoke, flowing clouds, or even moving people and horses into smooth, dreamy streaks of light and motion. This technique adds a surreal quality to your shots, emphasizing the timeless, otherworldly nature of the volcanic landscape. Imagine the smoke rising from the crater turning into a soft, flowing ribbon under the morning light—suddenly, your photo feels more like a painting than a simple snapshot. A tripod is essential here, along with neutral density (ND) filters to balance exposure when shooting in brighter conditions.
Wide-Angle vs. Telephoto Shots: Expanding and Isolating the Landscape
Choosing between a wide-angle and a telephoto lens can completely change the mood of your photographs. With a wide-angle lens (14–24mm), you can capture the full grandeur of the Tengger Caldera—the smoking Bromo, the symmetrical Mount Batok, and the towering Semeru all in one frame. This perspective highlights scale and drama, making the viewer feel as if they are standing there with you. On the other hand, a telephoto lens (70–200mm) allows you to zoom in and isolate specific elements, such as the textured rim of the crater, the smoke plumes twisting into the sky, or even a tiny horse rider against the vast desert of ash. Wide-angle gives you the epic story, while telephoto captures the intimate details—both are essential for a complete and dramatic portfolio of Bromo.
Aerial Drone Perspectives: Seeing Bromo from the Sky
Few techniques create as much drama as aerial photography, and Mount Bromo crater photography is a perfect subject for drone shots. From above, the crater reveals its circular shape in full, with smoke rising like a mystical beacon surrounded by the sea of sand. Drones can also capture the full layout of the caldera, giving your audience a sense of scale that ground-based shots cannot. Early morning flights, when the light is soft and shadows are long, often produce breathtaking results. However, flying a drone requires careful planning: always check local regulations, respect no-fly zones, and be mindful of the cultural significance of the area. Done responsibly, drone photography can add a truly cinematic layer to your visual story of Bromo.
Editing Tips for Bromo Crater Photography
Editing should enhance, not overpower. Increase contrast to emphasize textures, but avoid oversaturation. Bringing out the natural tones of volcanic rock, ash, and smoke keeps your shots authentic while still dramatic.
Capturing People and Culture Around Bromo Crater Photography
Photography at Bromo isn’t just about landscapes. The Tenggerese people, who live around the volcano, often wear traditional attire and ride horses across the sand. Including them in your shots adds cultural richness and human storytelling. During festivals like Yadnya Kasada, photos become even more powerful with rituals and offerings near the crater.
Weather Challenges and How to Overcome Them
Mist and Fog: Turning Obstacles into Atmospheric Drama
Mist and fog are common around Mount Bromo, especially in the early mornings and during the rainy season. At first, it can feel frustrating when the crater disappears behind a thick blanket of white. But instead of seeing it as a problem, think of it as an opportunity. Mist adds atmosphere, mystery, and depth to your images. By waiting patiently, you might catch the moment when the fog starts to lift, revealing the smoking crater like a hidden secret. Use the fog to frame your subject, or capture silhouettes of trees, people, or horses against the hazy background. A tripod helps stabilize your camera in low-light foggy conditions, while slightly adjusting your white balance can keep the mood natural.
Harsh Sunlight: Managing Strong Contrasts in the Middle of the Day
Once the sun rises higher, the light around Bromo can become harsh and unforgiving. Strong sunlight creates hard shadows, overexposed skies, and extreme contrast between bright and dark areas. To overcome this, photographers can use a polarizing filter to reduce glare and deepen the blue of the sky. Neutral density (ND) filters also help balance exposure when you want to shoot long exposures during daylight. Another solution is timing—try photographing in the early morning or late afternoon when the sun is lower, and the light is softer. If you do need to shoot in strong midday light, look for creative angles, like shooting from the crater rim with the sunlight behind you, or using shadows to add geometric drama to your composition.
Dust Storms: Protecting Yourself and Your Gear from the Sea of Sand
The Sea of Sand around Bromo can create sudden gusts of dust, especially when it’s dry and windy. These dust storms not only reduce visibility but can also damage your camera equipment if you’re not careful. The fine volcanic ash easily enters lenses, sensors, and buttons, which can cause lasting harm. To overcome this challenge, always carry protective gear: use a rain cover or dust cover for your camera, keep a microfiber cloth handy to wipe your lens, and avoid changing lenses in dusty conditions. For yourself, a mask and glasses can make breathing and seeing easier. Interestingly, dust storms can also add drama to your photos—capturing a lone rider or silhouette in the middle of a dusty swirl can result in powerful, cinematic images.
Safety Tips While Photographing the Crater
Stay cautious on the rim—it can be slippery and unstable. Volcanic dust is harsh on camera sensors, so keep equipment covered when not in use. Always respect local regulations and cultural practices when photographing near sacred sites.
Storytelling Through Your Photos
The best photos don’t just show a place—they tell a story. Capture the drama of the volcano alongside the quiet resilience of the locals. Think of each shot as a chapter, building a visual narrative that brings viewers into the Bromo crater photography experience.
Common Mistakes to Avoid
Overexposure of Smoke and Sky: Losing Detail in the Brightest Parts
Mount bromo photography – One of the most common errors when photographing Mount Bromo is overexposing the smoke plumes or the sky at sunrise. Because the smoke is bright white and the sky is filled with intense morning colors, it’s easy for your camera to blow out these highlights, leaving you with images that lack texture and detail. The result? Flat, washed-out skies and smoke that looks like a blank patch of white. To avoid this, always check your histogram and shoot in RAW so you can recover highlights during post-processing. Using exposure bracketing is also a smart way to capture multiple exposures that can later be blended into a perfectly balanced shot.
Shooting from Only One Angle: Missing the Variety of Perspectives
Many photographers go to Penanjakan, snap the classic postcard view of Bromo at sunrise, and call it a day. While that shot is undeniably beautiful, it barely scratches the surface of what Bromo has to offer. By limiting yourself to one angle, you miss out on dramatic perspectives from King Kong Hill, atmospheric layers from Love Hill, or the raw energy of standing on the crater rim itself. Each viewpoint tells a different story. To get the most out of your trip, explore multiple vantage points throughout the day. Moving around allows you to create a more complete visual narrative of Bromo’s landscape instead of just one iconic frame.
Ignoring the Surrounding Landscapes: Forgetting the Bigger Picture
Another mistake is focusing only on the smoking crater and forgetting the dramatic surroundings that make Bromo crater photography so unique. The Sea of Sand, the perfectly shaped Mount Batok, and the towering Semeru in the background all play key roles in the composition. Without them, your images may feel one-dimensional or incomplete. To overcome this, think about the crater not as a single subject, but as part of a grander volcanic stage. Use wide-angle lenses to include the sweeping caldera, or place people, horses, or trees in the frame for scale and context. By highlighting the surrounding landscapes, your photos will tell a more powerful and complete story of Mount Bromo’s majesty.
Conclusion
Capturing Mount Bromo crater photography is about more than just taking pictures—it’s about embracing the raw energy of nature. With the right timing, gear, and creative eye, you can create photographs that truly reflect the volcano’s dramatic character. Whether you’re standing on the crater rim or watching the sunrise from a hill, every angle offers a chance to immortalize this breathtaking wonder.
FAQs
1. What is the best month to Bromo crater photography?
The dry season, between April and October, offers the clearest skies and best light for photography.
2. Do you need a guide for the best photography spots?
Not strictly, but local guides can help you discover hidden viewpoints and provide cultural insights.
3. Can drones be used legally at Mount Bromo?
Regulations vary, so always check local rules. Some areas may restrict drone usage to protect sacred sites.
4. How early should you arrive for sunrise photos?
At least 3–4 AM to secure a good spot, especially at popular viewpoints like Penanjakan.
5. Is it safe to bring expensive gear near the crater?
Yes, but protect your equipment from volcanic dust with covers and regular cleaning.
Read more https://panoramalenstrip.com/ijen-blue-fire-travel-guide/


[…] the dry season is often the best time to capture its beauty. But how do you make the most of your photography trip to Bromo during this season? Let’s dive into the best tips to help you return home with […]