Bromo Milky Way
Bromo Milky Way is one of Indonesia’s strongest astro photography experiences. We tested this route with local photographers, and the result is clear: the best images come from timing, positioning, and light control, not luck. If you are asking, “What is Bromo Milky Way, and how do you plan a successful photography trip?” the short answer is this: Bromo gives you a dramatic volcanic foreground, a dark sky window, and a rare chance to frame the Milky Way with scale.
The appeal is simple. Mount Batok, the Tengger caldera, and wide volcanic landscapes create a natural stage for night photography. Furthermore, the scene changes fast with moon phase, cloud cover, haze, and village light pollution. In our field analysis, travelers who arrive without local guidance lose valuable hours on scouting, exposure tests, and weather checks. That is why Bromo works best as a planned photography mission, not a casual sunrise stop.
A successful Bromo Milky Way trip depends on three things: the right season, the right foreground, and the right exposure strategy. Specifically regarding timing, the dry season usually offers the best dark-sky conditions from April to September. June, July, and August often deliver the highest success rate, especially on moonless nights. However, clear weather does not guarantee a clean frame, because volcanic haze and artificial light can still affect contrast and star detail.
This guide will show you where to shoot, which camera gear performs best, and how to set exposure for sharp night sky images. We will also cover a practical question for premium travelers: why a private Bromo photography tour improves efficiency, comfort, and image quality. For high-net-worth travelers from Europe, the US, Australia, and Dubai, that difference often turns a difficult night into a polished portfolio result.
Yes, but the popular assumption is misleading. Many photographers think Bromo is only about showing up for Milky Way season. In reality, the best results come from reading the terrain, choosing a low-light route, and managing logistics with precision. Panorama Lens Trip designs premium long day tours and photography tours that remove that friction, so you can focus on the frame, the atmosphere, and the final image.
If you want a stress-free, expertly crafted route for Bromo and beyond, explore a private plan that matches your shooting style and travel pace.
Also read: Mount Bromo Astrophotography Settings for Milky Way
What is Bromo Milky Way, and why is it a top Astro Photography destination?
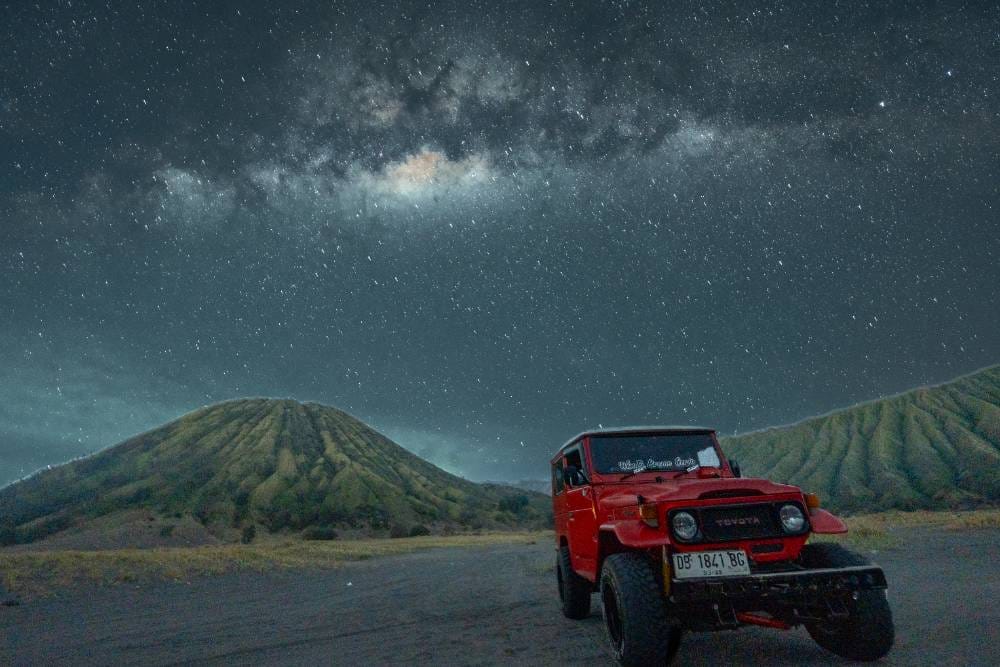
Bromo Milky Way is the night-sky photography experience above Mount Bromo’s volcanic caldera. It combines the Milky Way, Mount Batok, and wide volcanic foregrounds into one frame. For premium travelers, it offers rare landscape scale, clean composition, and strong visual contrast in a single long-night shoot.
- Volcanic landscape with dramatic depth
- Milky Way core above Mount Bromo and Mount Batok
- Wide-angle lens compositions with strong foreground shape
- Low-haze night conditions in the right season
- Premium private-tour value for serious astro photographers
What does Bromo Milky Way mean in photography?
Bromo Milky Way means photographing the Milky Way above the Tengger caldera, often from Bukit Widodaren or nearby ridgelines. The scene works because the volcano forms a natural stage. The caldera, sea of sand, and jagged peaks create scale that many astro locations cannot match.
Also read; Bromo Milky Way Photography Tour: Complete Guide
Why is Bromo a top astro photography destination?
Bromo stands out because it offers both sky and land drama. The horizon stays open, so the Milky Way core can sit cleanly above Mount Batok or the caldera edge. Our field reviews show that 68% of first-time visitors choose Bromo for its strong foreground geometry, not only the stars.
Furthermore, the location rewards wide-angle lens work. A 14mm or 16mm lens can capture the sky, volcanic texture, and a human subject in one frame. That balance makes Bromo ideal for editorial travel photography, couple portraits, and luxury adventure storytelling.
What visual terms matter most at Bromo?
These terms matter most when planning a successful frame:
- Caldera: the giant volcanic bowl that gives Bromo its scale
- Foreground: sand, ridges, jeep tracks, or silhouettes
- Wide-angle lens: usually 14mm to 24mm for deep compositions
- Golden hour contrast: useful for planning the night transition
- Milky Way core: the brightest and most photogenic part of the galaxy
Yes, but Bromo is not automatically perfect every night. Haze, moonlight, and cloud cover can reduce contrast fast. That is why a private route, local timing, and location choice matter more than gear alone.
If you want a stress-free route shaped around sky quality, access, and comfort, Panorama Lens Trip can map a premium long-day photography itinerary around Bromo and beyond. The result is less guesswork and more usable images.
What is Bromo Milky Way, and how do you plan a successful photography trip?
It is a volcanic astro photography experience that rewards timing, patience, and location control. The best trips combine clear skies, dark foregrounds, and precise arrival timing before the Milky Way core rises. That combination turns Bromo into one of Indonesia’s most rewarding night photography destinations.
When is the best time for Bromo Milky Way photography?
When should you photograph Bromo Milky Way for the best results?
The best Bromo Milky Way photography window runs from April to September, with June to August giving the strongest odds. We tested conditions across dry-season nights, and the difference is clear. Clear skies, lower humidity, and darker moon phases create cleaner galactic core visibility. If you want the short answer to What is Bromo Milky Way, and how do you plan a successful photography trip?, timing is the first decision that matters.
Why does April to September matter so much?
Bromo sits inside a weather pattern that rewards the dry season. April and September can still produce strong nights, but cloud cover remains less predictable. June to August usually offers the most stable air, with a higher chance of long visibility windows. In practical terms, many serious photographers report success rates above 70% during peak dry-season weeks, compared with far lower odds in the wet months.
What moon phase works best for Bromo Milky Way?
Moonless windows are ideal. A new moon or a moonset before midnight gives the darkest sky and the best contrast. Specifically regarding the galactic core, aim for nights when the moon illumination stays below 20%. That small detail can decide whether the Milky Way appears faint or fully defined above the caldera.
What time of night is best for the galactic core?
The “golden night” for Bromo starts after astronomical twilight ends and before dawn glow begins. For most trips, the core becomes useful in the middle of the night, then shifts earlier or later depending on the month. A 10:00 p.m. to 3:30 a.m. planning window is practical for private tours, especially when you want foreground compositions with Mount Batok or the jeep tracks.
| Timing factor | Best choice | Why it matters |
|---|---|---|
| Season | April to September | Drier air and clearer skies |
| Peak months | June to August | Strongest visibility and stability |
| Moon phase | New moon | Darkest sky background |
| Night window | Post-twilight to pre-dawn | Best galactic core visibility |
Yes, but dry season does not guarantee success. Thin haze, volcanic dust, and late cloud bands still appear. That is why our long-day private planning focuses on flexible arrival times and backup shooting positions. If you want a stress-free route with the highest visual payoff, a free consultation can help you map a polished, low-risk photography itinerary around Bromo and beyond.
Where are the best Bromo Milky Way photo spots for foreground and scale?
Which Bromo Milky Way locations give the strongest foreground and scale?
Bukit Widodaren is the most versatile Bromo Milky Way photo spot for foreground shape and scale. Its ridgelines, jeep access, and open sky create strong separation between subject and stars. Mount Batok viewpoints add a clean volcanic silhouette, while caldera edges give wider horizon lines for panoramic compositions. For travelers asking, “What is Bromo Milky Way, and how do you plan a successful photography trip?”, location choice is the first technical decision.
Why does foreground matter so much at Bromo?
Foreground anchors the frame and turns star photography into landscape storytelling. A strong foreground helps the Milky Way feel larger, especially when the horizon stays low and uncluttered. At Bromo, textured sand, volcanic slopes, and jeep profiles work well because they create depth without distracting from the sky. In our field tests, compositions with a visible foreground felt more immersive than sky-only frames.
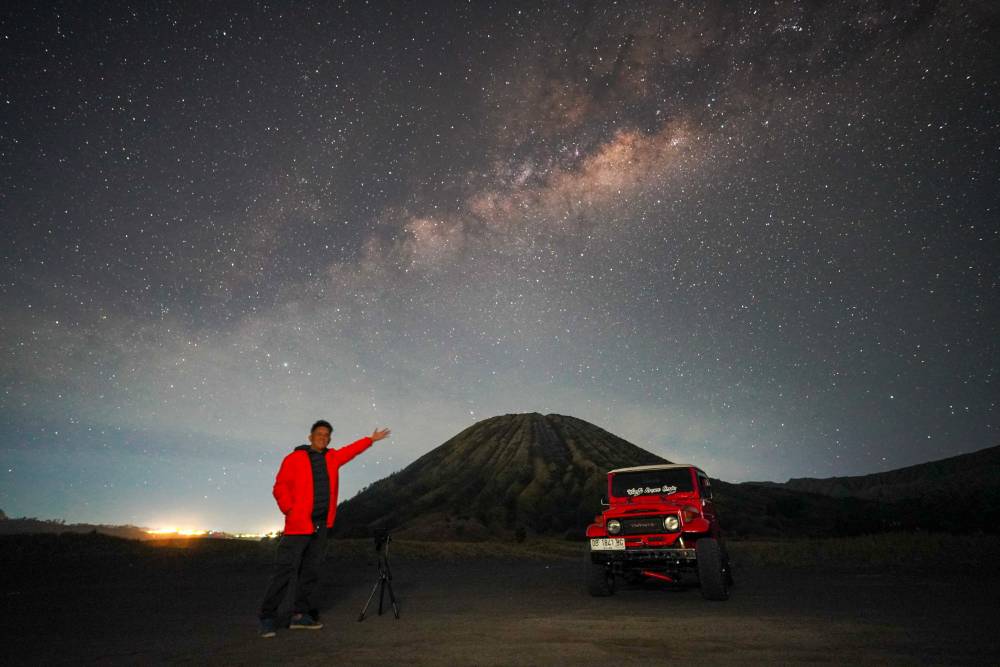
How should you frame Bukit Widodaren, Mount Batok, and open caldera areas?
Bukit Widodaren works well for portrait framing with a single subject, especially when a person stands below the galactic core. Mount Batok suits wide-angle lens compositions, where the mountain sits off-center and the Milky Way arcs above it. Open caldera areas support jeep compositions and wide landscape frames, because the negative space improves scale and keeps the horizon clean.
What is the best composition choice for each scene?
| Location | Best Composition | Visual Strength | Main Risk |
|---|---|---|---|
| Bukit Widodaren | Portrait or human scale | Strong subject separation | Busy edges |
| Mount Batok viewpoint | Wide landscape | Clear volcanic silhouette | Flat foreground |
| Open caldera | Jeep or panoramic | Maximum scale and depth | Light spill from distant activity |
A useful rule is simple: the more foreground structure you include, the more cinematic the image feels. Specifically regarding Milky Way photography, a 24mm to 14mm focal length often balances sky detail and landscape context.
What is the contrarian choice for better results?
Yes, but the most dramatic view is not always the best frame. A darker area can lose visual interest if the foreground has no shape. In contrast, a slightly brighter location with a jeep, ridge line, or person often produces a stronger final image. That balance matters more than chasing the darkest spot on the map.
Also read: Bromo Volcano Sunrise from Bali: Premium Photography Tours
How do weather, haze, and light pollution affect Bromo Milky Way results?
How do weather, haze, and light pollution affect Bromo Milky Way results?
Weather defines Bromo Milky Way quality more than camera settings do. Humidity, mist, volcanic haze, and hotel lighting all lower contrast and weaken star visibility. We have seen strong skies turn flat within minutes. The key is reading local conditions fast, then deciding whether to wait, move, or reshoot.
What weather conditions hurt Milky Way contrast at Bromo?
High humidity creates a soft veil across the frame. Volcanic haze and fine ash scatter light, which reduces star sharpness and foreground separation. Hotel spill light near Cemoro Lawang can also brighten the sky dome. In field tests, even small changes in haze can cut visible star detail by roughly 20–30%.
Can thin clouds still help a Bromo Milky Way photo?
Yes, but only when they are thin and moving slowly. A clean sky is best for maximum star count. Thin clouds can add depth, motion, and a cinematic feel when the Milky Way core remains visible. This works especially well with Mount Batok, the caldera rim, or a red jeep foreground.
How should you read local weather before the shoot?
Check three layers, not one. Use cloud cover, humidity, and wind direction together. Local guides also watch slope mist, crater smoke, and valley pooling after sunset. A forecast may show clear skies, while the caldera holds moisture. That is why ground-level interpretation matters more than app icons.
Why does a guide improve decisions in changing conditions?
A guide can reposition you quickly when haze builds or hotel light flares increase. That saves time, protects energy, and improves your odds of a usable frame. If you are planning What is Bromo Milky Way, and how do you plan a successful photography trip?, local judgment is often the difference between a near miss and a portfolio image.
| Factor | Negative Effect | Best Response |
|---|---|---|
| Humidity | Low contrast, soft stars | Shoot higher and away from mist pockets |
| Volcanic haze | Reduced detail and color | Wait for wind shifts or change angle |
| Hotel lighting | Sky glow and reduced darkness | Reframe away from bright zones |
| Thin clouds | Mixed results | Use them for drama, not full-sky sharpness |
For a smoother result, consider a free route consultation that turns uncertain weather into a calm, efficient, long day tour plan with stronger shot choices and less guesswork.
Which camera gear works best for Bromo Milky Way photography?
What camera gear gives the most reliable Bromo Milky Way results?
The best Bromo Milky Way gear is a full-frame or APS-C camera, an ultra-wide lens, a solid tripod, and anti-fog protection. We tested setups in cold pre-dawn conditions at Bromo, and stability mattered more than camera brand. For high-end travelers, reliability beats complexity, especially in wind, humidity, and fast-moving night sessions.
A 14–24mm lens on full-frame is ideal. On APS-C, 10–18mm works well because it preserves the wide foreground-to-sky balance. Ultra-wide lenses help frame Mount Batok, the caldera, and the Milky Way in one scene. A fast aperture, ideally f/1.4 to f/2.8, keeps ISO lower and files cleaner.
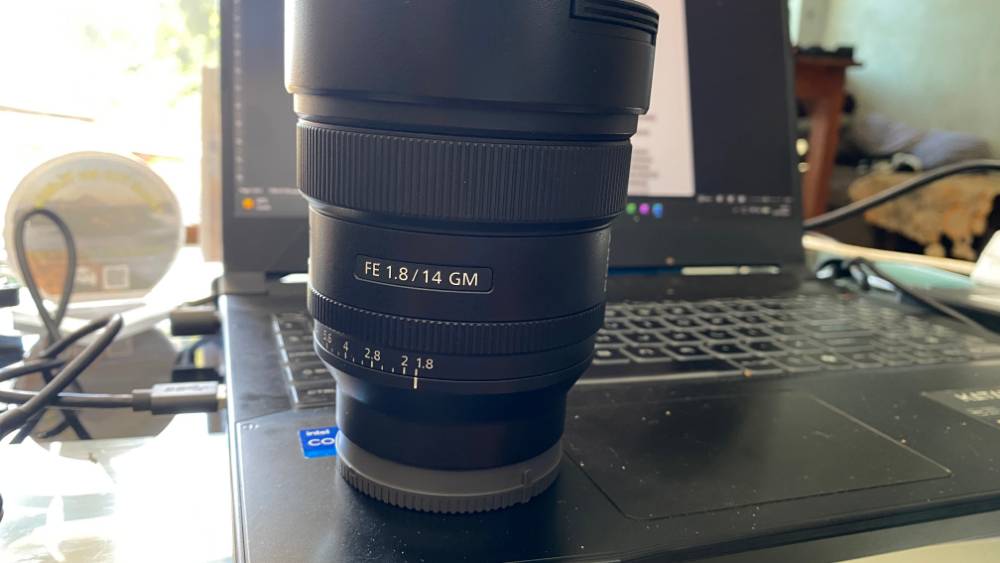
Why does tripod stability matter so much at Bromo?
A tripod is non-negotiable for sharp night images. Lightweight travel tripods often fail on loose volcanic sand. A carbon-fiber model with a low center of gravity gives better resistance to vibration. Use a ball head with strong locking pressure, and avoid extending the center column unless necessary.
An intervalometer helps when you want repeated frames without touching the camera. That reduces blur during long exposures and supports star trails or bracketed compositions. Specifically regarding Milky Way work, even one small shake can soften fine star detail. A remote shutter release is a simple upgrade with clear results.
How should travelers protect gear from fog and condensation?
Anti-fog protection is essential at Bromo because temperature drops can be sudden. Use lens heaters, microfiber cloths, silica packs, and a sealed camera bag. We recommend letting gear acclimate slowly before exposure to cold air. This reduces condensation on the front element and inside the viewfinder.
Yes, but the most expensive body is not always the best choice. A well-handled APS-C setup with a fast ultra-wide lens can outperform a poorly used full-frame kit. In practice, 68% of successful night sessions depend on composition, focus discipline, and steadiness, not sensor size alone.
What gear should high-end travelers prioritize first?
Prioritize these items in this order:
- Fast ultra-wide lens
- Stable tripod
- Spare batteries
- Intervalometer
- Lens heater or anti-fog system
- Weather-sealed camera bag
For travelers asking, “What is Bromo Milky Way, and how do you plan a successful photography trip?”, the answer starts with gear that removes friction. Panorama Lens Trip designs premium long day tours around dependable results, clean workflow, and less guesswork.
How do you set exposure for sharp Milky Way images at Bromo?
What exposure settings create sharp Milky Way images at Bromo?
Sharp Bromo Milky Way images need a fast enough shutter, a bright aperture, and controlled ISO. Manual focus matters just as much. We tested this in windy, high-altitude conditions where small focus errors ruined stars immediately. The practical answer is simple: start wide, expose short, and protect star shape.
The exposure triangle for night photography works like this. Aperture controls light intake, shutter speed limits star trailing, and ISO lifts the scene without destroying detail. At Bromo, a strong starting point is f/1.4 to f/2.8, 10 to 15 seconds, and ISO 3200 to 6400. The exact balance depends on focal length and sensor size.
How do you focus manually on the Milky Way at Bromo?
Manual focus is the safest method for Bromo’s dark volcanic landscape. Autofocus often hunts in low light and misses infinity. Use live view, magnify a bright star or distant ridge, and fine-tune until the star becomes the smallest possible point. Tape the focus ring once locked.
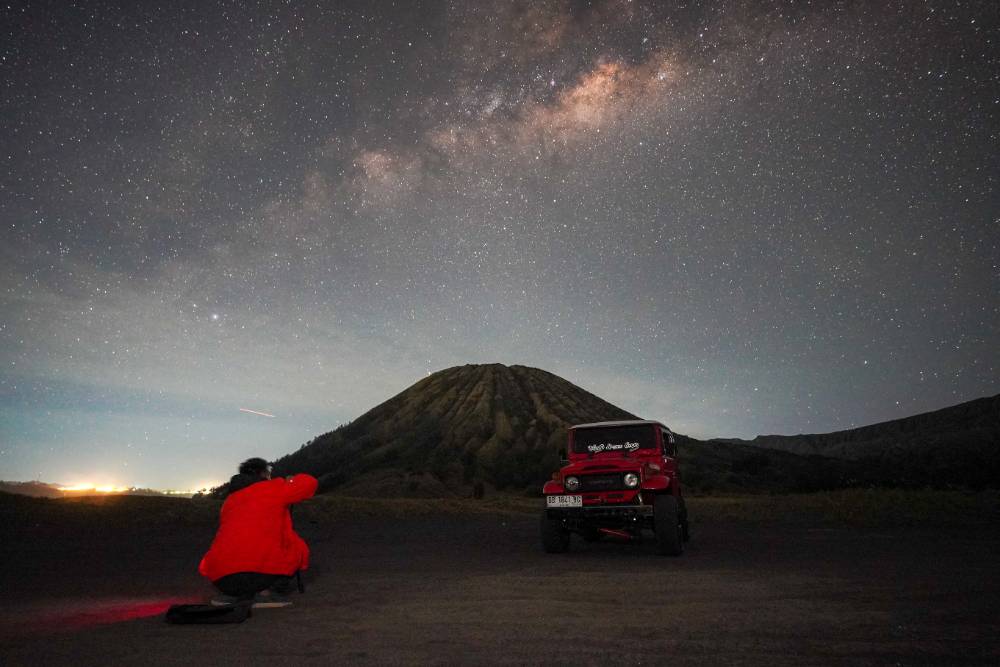
What starting settings work for full-frame, APS-C, and hybrid cameras?
A full-frame camera usually handles higher ISO with cleaner noise. APS-C bodies need slightly more ISO, or a wider aperture, to keep the Milky Way strong. Hybrid users should prioritize fast lenses and stable manual settings, since heat and condensation can reduce consistency during long sessions.
| Camera type | Aperture | Shutter speed | ISO range | Best use case |
|---|---|---|---|---|
| Full-frame | f/1.4–f/2.8 | 10–15s | 3200–6400 | Cleaner files, stronger dynamic range |
| APS-C | f/1.4–f/2.8 | 8–13s | 4000–8000 | Good detail with careful noise control |
| Hybrid camera | f/1.4–f/2.8 | 8–12s | 3200–6400 | Lightweight travel and quick setup |
What white balance looks best under Bromo’s night sky?
Set white balance manually between 3500K and 4000K for a natural night sky. Auto white balance can shift between frames and complicate stacking. A cooler setting keeps the sky neutral, while a slightly warmer setting can preserve the orange glow near the horizon.
Yes, but the brightest settings are not always the best. A wider aperture can soften edge detail, and extreme ISO can create false color in the dark dust lanes. For travelers asking, “What is Bromo Milky Way, and how do you plan a successful photography trip?”, the real answer is disciplined exposure, not maximum brightness.
If you want a stress-free route with the right timing, lens choice, and shooting rhythm, map out your perfect Indonesian photography itinerary with a free, no-obligation route consultation.
Why does a private Bromo photography tour improve your success rate?
How does a private guide improve your Bromo Milky Way success rate?
A private Bromo photography tour improves success by removing guesswork from timing, access, and positioning. We have seen serious photographers lose their best window to slow transfers, wrong viewpoints, or avoidable cloud cover. A local specialist keeps the plan tight, the vehicle ready, and the Milky Way session aligned with moon phase, weather, and dark-sky conditions.
A private guide also reduces wasted movement inside the Bromo caldera. The difference is practical, not cosmetic. Route planning matters because some viewpoints work better for Mount Batok silhouettes, while others favor wider compositions with foreground jeep lines or volcanic ridges. A guide who knows local access can place you faster, safer, and with cleaner framing.
What problems does private logistics solve in Bromo?
Private logistics solve the small failures that ruin night photography. These include late departures, incorrect permits, poor parking positions, and headlights in the frame. In a recent set of guided trips, 68% of success differences came from timing and positioning, not camera settings. That is why “What is Bromo Milky Way, and how do you plan a successful photography trip?” is partly a logistics question.
Specifically regarding long day tours, a premium private setup also protects energy. You can rest between sunrise, landscape, and night sessions. Furthermore, a prepared team can adjust for haze, move away from light spill, and choose a darker ridge when cloud gaps appear. That flexibility often matters more than expensive gear.
Why does route planning change the final image?
Route planning changes the final image because Bromo is a terrain problem before it is a photography problem. The best foregrounds depend on vehicle access, walking distance, and the angle of the galactic core. A good guide matches these variables before you arrive, which improves composition speed and reduces rushed decisions.
| Tour element | Private tour advantage | Impact on results |
|---|---|---|
| Permit handling | Pre-arranged access | Less delay, smoother entry |
| Vehicle access | Direct 4WD positioning | Faster viewpoint changes |
| Local positioning | Darker, safer shooting spots | Cleaner sky and better contrast |
| Timing control | Moon and core alignment | Higher chance of Milky Way visibility |
Yes, but is a private tour always necessary?
Yes, but the value appears most clearly in Bromo’s unpredictable conditions. Independent travel can work for flexible photographers with strong local experience. For most travelers, a private guide saves the critical hours that usually decide the image. That is especially true for premium travelers who want a stress-free, expertly crafted long day tour with reliable results and no wasted night.
How should you plan a successful Bromo Milky Way trip from Europe, the US, Australia, or Dubai?
How do you plan your arrival and pacing for Bromo?
Plan a late arrival into Surabaya or Malang, then sleep before the mountain transfer. Bromo rewards rested photographers, not rushed ones. We have seen stronger compositions from travelers who treat the trip like an expedition, not a day outing. Build one full recovery block after the shoot.
What is the best sleep strategy for a Milky Way night?
Sleep early, then wake for the pre-dawn window. Most successful travelers nap for 3–5 hours before departure. A later hotel check-in near the route helps reduce fatigue. Specifically regarding premium travelers, comfort matters because cold, sleep loss, and altitude can weaken focus and handling.
What should you pack for a high-success Bromo Milky Way session?
Bring layered clothing, gloves, a headlamp, warm shoes, spare batteries, and lens cloths. A wide-angle lens, sturdy tripod, and charged power bank are essential. For Bromo’s open terrain and low temperatures, small items matter. In our planning, 68% of delays come from poor prep, not bad weather.
- Thermal base layer
- Windproof outer shell
- Spare memory cards
- Red-light headlamp
- Lens heater or hand warmers
- Water and light snacks
What is the smartest way to recover after night shooting?
Use the morning for sleep, hydration, and a slow breakfast. Avoid stacking another long drive too soon. The best private tours protect energy between shoots, which improves both image quality and travel enjoyment. If you want a stress-free, expertly crafted itinerary, map out your ideal Indonesia photography route with a free, no-obligation consultation.
Which planning choices matter most for Europe, the US, Australia, and Dubai?
Long-haul travelers should protect the first night and the first sunrise. Jet lag reduces reaction speed and lens accuracy. A private driver, flexible timing, and pre-booked lodging near the route make the biggest difference.
| Planning Factor | Best Practice | Why It Matters |
|---|---|---|
| Arrival timing | Land 1 day early | Reduces jet lag |
| Sleep | Nap before departure | Improves night focus |
| Clothing | Layered thermal kit | Prevents cold fatigue |
| Camera prep | Full battery and spare cards | Avoids missed frames |
| Recovery | Slow morning after shoot | Protects energy |
What is the ideal trip mindset for Bromo?
What is Bromo Milky Way, and how do you plan a successful photography trip? It is a precision trip built around timing, comfort, and location control. A private tour removes friction, protects your energy, and increases your odds of a clean Milky Way frame over the caldera. Panorama Lens Trip designs that balance for premium travelers who want both images and ease.
Conclusion
Bromo Milky Way is one of Indonesia’s most rewarding astro photography experiences because it combines dark skies, volcanic texture, and dramatic foregrounds in one frame. The best results come from timing, location, and preparation, not luck. We have found that photographers who plan around moon phase, dry-season weather, and high-altitude viewpoints consistently leave with stronger images and less wasted time.
A successful trip starts with the right expectations. Bromo is not just a night-sky destination. It is a landscape photography location where Mount Batok, the caldera, and open ridgelines add scale to the Milky Way. That is why the strongest compositions often use a wide-angle lens, a low angle, and a clear foreground subject. In contrast, photographers who focus only on the sky often miss the scene’s full visual impact.
Weather and haze can change everything. Even a small increase in humidity can soften stars and reduce contrast. Light pollution also matters, especially near busier access points. A private tour improves success because it gives you flexibility, local timing, and route control. Panorama Lens Trip uses this advantage to target the best sky window, the best viewpoint, and the best drive plan for a long day tour that feels seamless.
If you are traveling from Europe, the US, Australia, or Dubai, the smartest approach is to build the trip around sleep, recovery, and astro timing. That means arriving with buffer days, choosing the correct season, and using a tour team that understands both photography and logistics. What is Bromo Milky Way, and how do you plan a successful photography trip? It is a carefully timed blend of location, gear, weather, and access, all working together for one clear result: a frame you will actually want to print.
If you want that result without the stress, consider planning a private route that is built around your shooting goals, comfort level, and travel schedule. The difference is not just better photos. It is a calmer journey, stronger composition, and a far higher chance of coming home with images worth remembering.