Introduction – Best camera settings for Ijen Sunrise
Capturing the first golden rays that rise over the mystical Ijen Crater is a breathtaking experience that every landscape photographer dreams of. The dramatic mix of sulfur smoke, volcanic textures, and glowing skies creates a scene that’s both powerful and serene. However, photographing this natural wonder requires more than just luck and timing — it demands an understanding of the best camera settings for Ijen sunrise. The lighting changes rapidly from deep blue to fiery orange, challenging even experienced photographers to adjust exposure, aperture, and ISO precisely. Mastering the best camera settings for Ijen sunrise ensures that your photos don’t just record the moment but truly convey the magic, depth, and emotion of this extraordinary volcanic landscape.
Understanding Ijen Crater and Sunrise Photography
The Beauty of Ijen Crater
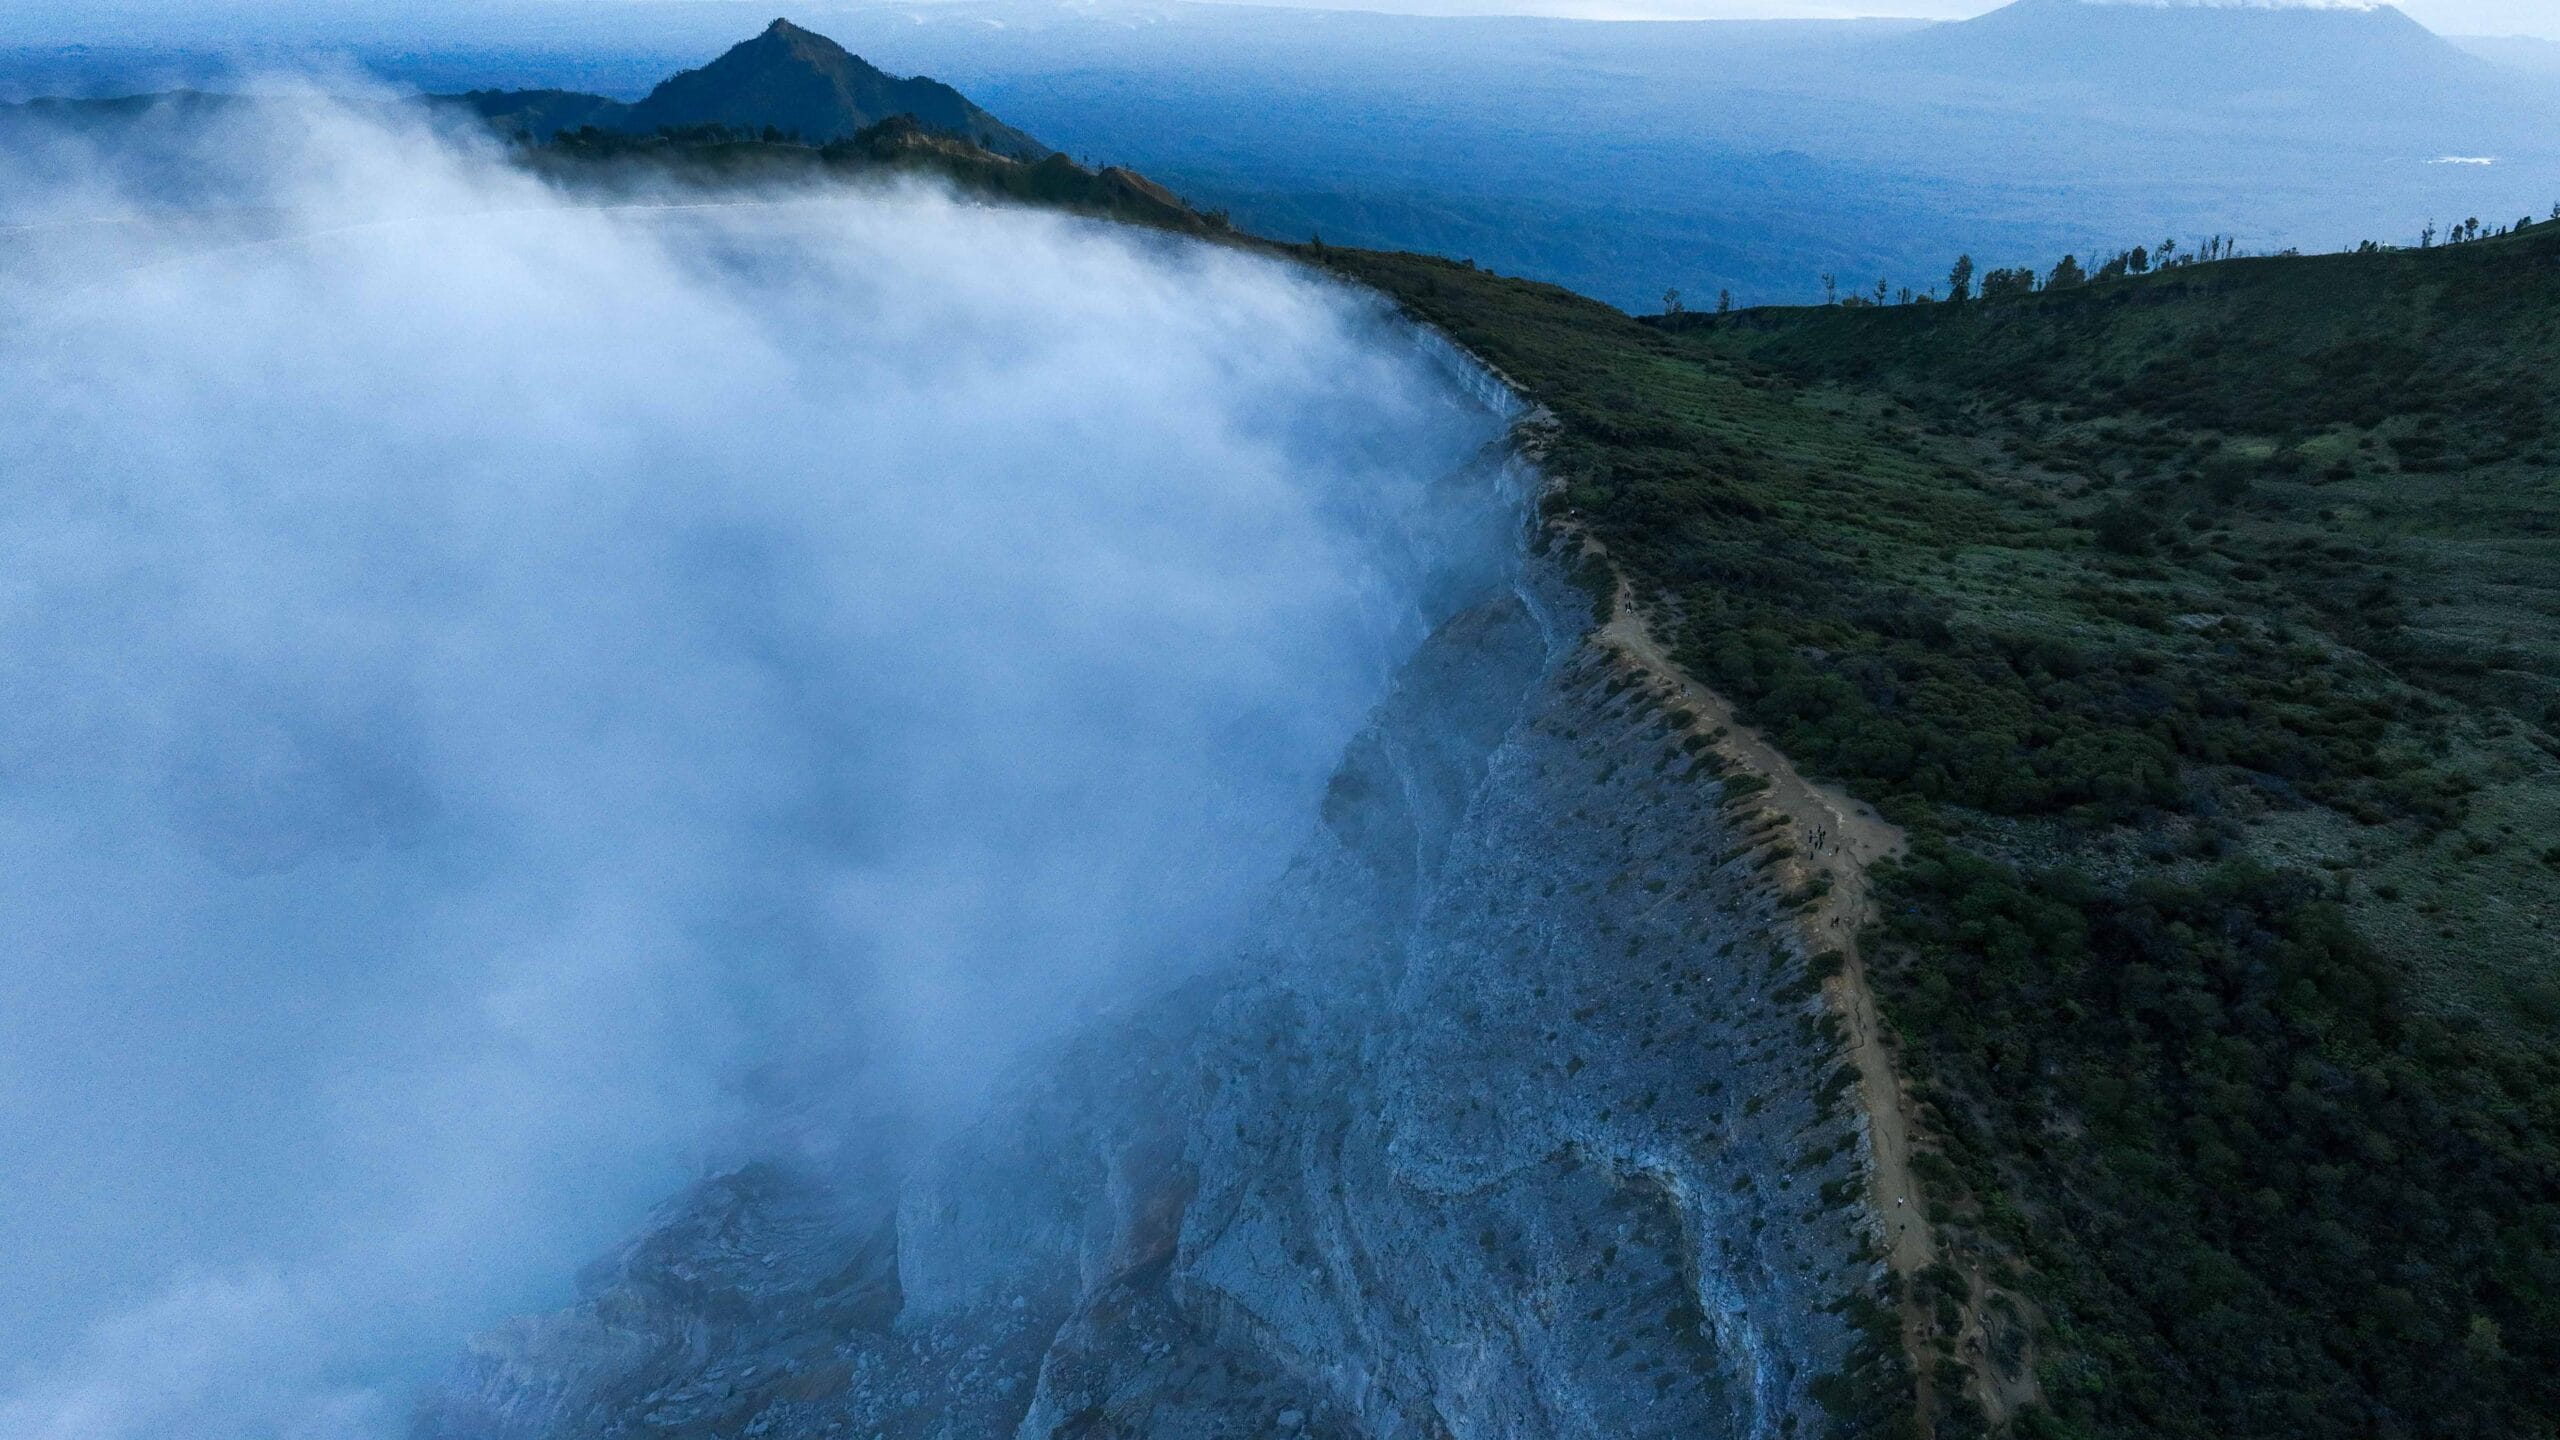
Ijen is famous for its turquoise sulfur lake and mystical blue fire. But at sunrise, the entire crater transforms into a golden canvas with hues of pink, orange, and purple.
Unique Challenges of Ijen Sunrise Photography
Low light, fast-changing conditions, and high contrasts between dark foregrounds and bright skies make shooting at Ijen a challenge. This is where mastering your camera settings becomes crucial.
Essential Gear for Ijen Sunrise Shots
Recommended Camera Types
A DSLR or mirrorless camera with manual controls is ideal. Full-frame sensors handle low light better, but APS-C cameras can still perform excellently.
Lenses That Work Best for Sunrise
Wide-angle lenses (16–35mm) are perfect for capturing the vast crater, while a telephoto (70–200mm) lets you zoom into dramatic details.
Must-Have Accessories
- A sturdy tripod for stability
- Extra batteries (cold weather drains them fast)
- ND or polarizing filters for creative effects
Preparing for the Shoot
Physical Preparation for the Hike
The trek up Ijen Sunrise starts early in the dark. Wear good hiking shoes, bring a headlamp, and carry enough water.
Planning Your Shooting Spot
Arrive early to secure the best viewpoint. Popular spots fill up quickly, especially during weekends.
Safety Considerations
Sulfur fumes can be intense—carry a mask if you plan to get close to the crater.
Best Camera Settings for Sunrise at Ijen
The Ideal Aperture Range
Stick to f/8–f/16 for sharp landscapes with wide depth of field.
Shutter Speed Adjustments
Start at 1/30–1/60 sec and adjust based on light. Longer exposures can add a dreamy effect to mist or clouds.
ISO Settings
Keep ISO low (100–400) to minimize noise. Raise it only if shutter speed drops too much in low light.
Shooting in RAW vs JPEG
Shooting in RAW vs JPEG refers to the difference in how your camera saves and processes image data. A RAW file contains uncompressed and unprocessed data straight from your camera’s sensor, preserving maximum detail, dynamic range, and color information. A JPEG file, on the other hand, is compressed and processed within the camera, resulting in a smaller file that’s ready to share but with less editing flexibility.
For Ijen sunrise photography, shooting in RAW is highly recommended because of the extreme lighting contrasts between the dark crater and bright sunrise sky. RAW files allow you to recover overexposed highlights, lift shadow details, and fine-tune color tones during post-processing without losing image quality. JPEGs are convenient for quick sharing or when memory space is limited, but they offer much less room for correction.
In short, RAW captures the full story of your sunrise, giving you creative freedom in editing, while JPEG delivers a simplified version suitable for immediate use. Choosing between them depends on your priorities—flexibility and quality with RAW, or convenience and speed with JPEG.
White Balance and Color Temperature
White balance and color temperature refer to how your camera interprets the colors of light in a scene so that white objects appear truly white and all other colors look natural. Different light sources — such as the warm glow of sunrise or the cool blue tones before dawn — emit light at varying color temperatures, measured in Kelvin (K).
In Ijen sunrise photography, white balance plays a vital role in capturing the true mood of the scene. The early morning light can shift from deep blue before sunrise (around 4000K) to golden-orange hues as the sun rises (around 5500–6500K). By adjusting your white balance, you can either preserve the natural warmth of the sunrise or create a cooler, moodier effect depending on your artistic vision.
Essentially, mastering white balance and color temperature allows you to control the emotional tone of your photos — whether you want to highlight Ijen’s soft, misty calmness or the fiery glow of its volcanic morning sky.
Exposure and Dynamic Range
Avoid blown-out skies by using exposure compensation (-1 to -2 EV). For balanced shots, try exposure bracketing and blend later.
Evaluative Metering works for balanced exposures.
Spot Metering helps if you want to expose for the sky or a specific subject.
Metering Modes for Ijen Sunrise Photography: Choosing the Right Light Measurement for Perfect Shots
Evaluative (Matrix) Metering – A Balanced Approach for Capturing the Whole Scene
Evaluative or matrix metering is the most commonly used mode for sunrise photography. It analyzes the entire frame, dividing it into multiple zones and averaging the light levels. This helps balance the brightness of the glowing sky with the darker foreground of Ijen’s crater. If you want an all-around reliable option that avoids extreme over- or underexposure, evaluative metering is your safest choice.
Spot Metering – Perfect for Capturing Dramatic Sky Tones
Spot metering measures light in a very small area of your frame, usually about 2–5% of the scene. This is incredibly useful during sunrise when you want to expose correctly for the bright sun or the colorful sky while allowing other parts of the frame (like the foreground) to naturally darken into silhouette. It’s the best choice if your creative goal is dramatic sunrise shots with striking contrasts.
Using Filters to Enhance Sunrise Shots: Mastering Light and Colors at Ijen Crater
Neutral Density (ND) Filters – Controlling Light for Stunning Long Exposures
Neutral Density filters are like sunglasses for your camera—they reduce the amount of light that enters the lens without altering the colors. At Ijen during sunrise, the light can shift quickly from dim to bright. ND filters allow you to slow down your shutter speed even in brighter conditions, letting you capture soft, flowing clouds, dreamy mist, or smooth movement in the volcanic landscape. This filter is essential if you want to experiment with long exposure sunrise photography without overexposing your shots.
Polarizing Filters – Enhancing Colors and Reducing Unwanted Glare
Polarizers are excellent for intensifying the natural colors of the sunrise, making the skies bluer and the golden tones richer. They also cut down on glare from reflective surfaces like water, rocks, or even mist around Ijen’s crater lake. By reducing haze, a polarizer helps you achieve crisp, vibrant photos that feel more alive and true to what your eyes see in person.

Focusing Techniques: Achieving Sharp Sunrise Photos at Ijen Crater
Choosing Between Manual Focus and Autofocus
During sunrise at Ijen, light conditions change quickly—from near darkness before dawn to bright skies within minutes. Autofocus can struggle in the early low-light phase, often hunting for contrast and failing to lock onto a subject. In these cases, switching to manual focus gives you more control and precision. Once the light improves, autofocus becomes more reliable and can save time when capturing fleeting sunrise moments.
Using Live View for Pinpoint Accuracy
When shooting landscapes, especially at wide angles, small focus errors can make your entire image appear soft. Using your camera’s Live View mode allows you to magnify the image on your screen and manually fine-tune focus, ensuring the crater rim, foreground rocks, or distant sky remains razor-sharp.
Focusing One-Third into the Scene for Maximum Depth
A golden rule in landscape photography is to focus about one-third of the way into your frame. This creates a large depth of field, keeping both the foreground (such as volcanic rocks or hikers) and background (the rising sun and crater) in sharp detail. Paired with a narrow aperture (f/8–f/16), this technique ensures the entire scene looks crisp.
Using Infinity Focus for Wide Landscapes
When capturing vast sunrise panoramas at Ijen, infinity focus works well to keep distant elements like mountain ridges and colorful skies sharp. However, be cautious—don’t just turn your lens all the way to the infinity symbol. Instead, test where your lens truly hits infinity focus (it can vary slightly) and mark it in advance.
Employing Focus Lock to Maintain Sharpness
If you’re recomposing your shot after focusing, use your camera’s focus lock (half-pressing the shutter button or using back-button focus). This ensures your focus doesn’t shift accidentally, which is especially important when working with moving clouds, mist, or hikers walking into your frame.
Checking Focus Frequently During Changing Light
The transition from darkness to sunrise happens quickly at Ijen. What looked sharp in the dark may not be as precise once light floods the crater. Make it a habit to zoom in and check focus between shots, especially if you change lenses or move to a new composition.
Blending Multiple Focus Points (Focus Stacking)
For advanced photographers, focus stacking can elevate your sunrise shots. By taking multiple images focused at different distances (foreground, midground, and background), and blending them later in editing software, you can achieve maximum sharpness across the entire frame. This is particularly useful when you want both the crater rim and the rising sun perfectly crisp.

Composing Stunning Ijen Sunrise Frames: Crafting Breathtaking Visual Stories at Ijen
Applying the Rule of Thirds for Balanced Sunrise Compositions
The rule of thirds is a timeless guideline that helps balance your shot naturally. Imagine your frame divided into nine equal parts with two vertical and two horizontal lines. Place the horizon along one of these lines—preferably the upper third for a stronger foreground or the lower third if the sky is the main subject. At Ijen, placing the glowing crater rim or sulfur lake along one-third of your frame adds harmony and draws the viewer’s eyes into the landscape.
Adding Foreground Interest to Create Depth and Dimension
One of the secrets to captivating sunrise photos is incorporating a strong foreground element. This could be a rocky path, sulfur miner’s silhouette, or even volcanic texture leading toward the sunrise. Foreground elements act as an entry point for the viewer’s eye, guiding it deeper into the image and creating a powerful sense of scale—especially important in Ijen’s vast volcanic terrain.
Using Leading Lines to Guide the Viewer’s Eye
Look for natural lines in the environment—like mountain ridges, trails, or smoke trails from the crater—that draw attention toward the rising sun. These leading lines create visual flow and storytelling within your photo. For instance, a winding trail illuminated by soft morning light can guide the eye from the dark foreground straight into the glowing sky.
Balancing Light and Shadow for Dramatic Impact
Ijen sunrise often brings strong contrasts between illuminated clouds and shadowed volcanic slopes. Instead of avoiding shadows, use them creatively to highlight depth and mystery. Position yourself so that the light falls diagonally across your frame—this side lighting enhances textures, making the rugged crater surface look even more dynamic.
Including Human Elements for Scale and Storytelling
Adding people—like hikers, sulfur miners, or fellow photographers—can inject emotion and perspective into your shot. A small human silhouette against the vast crater and rising sun instantly tells a story of adventure and awe. It helps the viewer connect emotionally and appreciate the grand scale of Ijen’s natural beauty.
Experimenting with Different Angles and Perspectives
Don’t just shoot from eye level. Crouch low to include detailed foregrounds or climb slightly higher to capture wider vistas. A low-angle shot emphasizes textures on the ground, while a high vantage point captures the grand expanse of the crater. Exploring angles helps you create unique compositions that stand out from the typical sunrise photo.
Using Reflections and Mist for Creative Atmosphere
Sometimes, the crater lake or nearby puddles can reflect the golden sunrise, doubling the visual beauty of your frame. Similarly, morning mist and sulfur smoke can diffuse light, creating a dreamy, ethereal mood. Don’t shy away from these natural effects—they add atmosphere and mystery that make your photo unforgettable.
Framing the Scene Naturally
Use surrounding elements—such as rocky formations, overhanging branches, or volcanic ridges—to frame your composition. This draws focus toward the sunrise and gives your image a sense of depth and containment. At Ijen, framing can help simplify a chaotic landscape while emphasizing the glowing sky as the main subject.
Shooting in Both Horizontal and Vertical Formats
While landscapes are traditionally shot horizontally, vertical compositions (portrait orientation) can create striking results—especially when you want to emphasize the height of the rising sun, the depth of the crater, or leading lines that stretch into the sky. Always experiment with both to see which captures the mood best.
Telling a Story Through Composition
Every photo at Ijen has a story—of endurance, wonder, and the raw power of nature. Think beyond beauty: What do you want your viewer to feel? Awe at the sunrise? Respect for the miners? Serenity in the morning mist? Your composition should reflect that emotional narrative, turning a simple photo into a meaningful image.
Long Exposure Photography at Ijen
Long exposure photography at Ijen refers to the technique of using slow shutter speeds to capture movement and light over a period of time—typically several seconds or more—resulting in smooth, dreamy, and visually dramatic effects.
At Ijen Crater, this method is especially powerful during sunrise. By keeping the camera’s shutter open longer, you can soften moving elements like drifting clouds, mist, or smoke from sulfur vents, while keeping the rugged landscape sharp and still. The result is a surreal and atmospheric image that highlights the contrast between Ijen’s volcanic energy and its calm, glowing morning light.
In essence, long exposure transforms the scene from a simple snapshot into an artistic interpretation of time—revealing the motion, emotion, and serenity of Ijen’s sunrise in a way that the naked eye can’t see.
Post-Processing Your Sunrise Photos
Even after capturing your shots using the best camera settings for Ijen sunrise, the journey to creating a masterpiece continues in post-processing. Editing allows you to refine the colors, enhance contrast, and recover details from the shadows or highlights that your camera couldn’t fully capture on-site. Start by adjusting white balance to balance the warm golden tones of the sunrise with the cooler hues of the crater landscape. Next, fine-tune exposure, clarity, and vibrance to make your photo more lifelike while preserving its natural beauty. Shooting in RAW gives you the flexibility to make these adjustments without degrading image quality. Remember, post-processing isn’t about changing reality — it’s about amplifying what your lens truly saw through the best camera settings for Ijen sunrise, ensuring every image reflects the awe and serenity of this volcanic wonder.
Common Mistakes to Avoid: Ensuring Perfect Sunrise Shots at Ijen
Overexposing the Bright Sunrise Sky and Losing Detail
One of the most common mistakes is letting the camera expose too much for the dark foreground, which causes the sunrise sky to blow out into pure white with no details. Always keep an eye on your histogram and use exposure compensation to bring down highlights. Remember—details in the sky are far more valuable than overly bright shadows.
Underexposing the Foreground and Ignoring the Crater’s Beauty
On the other hand, many photographers only expose for the sky, leaving the crater and its unique volcanic features completely dark. While silhouettes can be beautiful, don’t forget to capture at least a few shots where the foreground is visible. Using bracketing or graduated filters helps balance both areas so you don’t lose the magic of Ijen’s landscape.
Forgetting to Stabilize the Camera for Long Exposures
Sunrise often tempts photographers into experimenting with long exposures, but without a tripod, your shots will likely turn out blurry. Handholding is rarely stable enough, especially when using slower shutter speeds. A sturdy tripod is your best friend for ensuring sharp, breathtaking results.
Conclusion
Mastering the best camera settings for Ijen sunrise is the key to transforming a simple moment into an unforgettable photograph that captures both the beauty and power of nature. The unique light over Ijen Crater — from deep twilight blues to blazing golden tones — challenges photographers to adapt quickly and creatively. By understanding exposure, aperture, ISO, and composition, you can bring out every subtle detail of the volcanic landscape and glowing sky. Whether you’re a beginner or a seasoned photographer, taking the time to learn the best camera settings for Ijen sunrise will help you produce sharper, more dynamic, and emotionally resonant images. So when you next stand before the crater, camera in hand, remember that the best camera settings for Ijen sunrise aren’t just about technical precision — they’re about capturing the spirit of a place where light and earth meet in perfect harmony.

[…] best time to witness the Ijen Sunrise is during the dry season, from April to October, when skies are clear and the paths are safe. The […]
[…] Surabaya to Ijen Blue Fire Tour is crucial to ensure a safe and enjoyable experience. The hike to Ijen Crater is moderately challenging, with steep slopes, cold temperatures, and sulfur fumes to contend with. […]
[…] photography at Ijen sunrise is a high-reward mix of planning, creative vision, and responsible practice. The crater’s color, […]
[…] More tips: Best Camera Settings for Ijen Sunrise Shots […]