Introduction
Sunrise and Ijen’s Blue Fire Photography Tips – Have you ever dreamed of capturing something straight out of another world? Imagine glowing blue flames dancing in the darkness, followed by a sunrise that paints the sky in shades of gold and pink. That’s what awaits you at Mount Ijen, one of Indonesia’s most breathtaking and surreal photography destinations. Whether you’re a professional photographer or a passionate traveler with a camera, mastering Ijen’s Blue Fire and Sunrise photography can take your portfolio to another level.
About Ijen Crater and Its Mystical Blue Fire
Nestled in East Java, Indonesia, Mount Ijen is famous for its rare and mesmerizing Blue Fire phenomenon, caused by burning sulfuric gases that create glowing blue flames in the darkness. This natural wonder, combined with the world’s largest acidic turquoise lake, offers photographers an otherworldly landscape filled with dramatic contrasts of light and color — from the ethereal blue flames before dawn to the golden hues of sunrise.
For those seeking to capture its magic, following Ijen’s Blue Fire photography tips is essential. The challenging terrain, shifting light, and sulfuric atmosphere demand skill and preparation. With the right techniques — such as long exposure, proper timing, and creative composition — Ijen’s Blue Fire photography tips can help transform fleeting moments into stunning, once-in-a-lifetime images.
Why Ijen is a Photographer’s Dream
Mount Ijen is a paradise for photographers who crave dramatic, natural beauty unlike anywhere else on Earth. From the surreal Blue Fire that glows vividly before dawn to the breathtaking turquoise crater lake that reflects the morning sun, every frame tells a powerful story of contrast and wonder. The mix of darkness, light, and color gives photographers endless creative opportunities to experiment with exposure, angles, and compositions. Following Ijen’s Blue Fire photography tips allows you to capture these fleeting moments with precision — transforming the volcano’s mysterious energy into captivating, professional-quality images.
Beyond its glowing flames, Ijen offers an ever-changing environment where mist, smoke, and sunlight interact in stunning harmony. The rugged terrain, sulfur miners at work, and the surrounding highland views all add layers of storytelling potential. Applying Ijen’s Blue Fire photography tips helps photographers make the most of these unique conditions, turning each visit into a collection of unforgettable visuals that capture both the raw power and fragile beauty of nature.
Best Time to Visit Ijen for Photography
Timing plays a huge role in capturing the perfect shot of Mount Ijen. The best months to visit are during the dry season, from April to October, when the skies are clear, and visibility is at its best. During this period, the trails are less slippery, and the chances of seeing the Blue Fire are much higher. For the most stunning results, plan your hike to reach the crater before 3 a.m. — this is when the flames are brightest and the air is clearest. Applying Ijen’s Blue Fire photography tips during these early hours ensures you get the ideal lighting and exposure to capture the glowing phenomenon in its full brilliance.
After photographing the mesmerizing flames, stay for sunrise as the first light reveals the turquoise crater lake and golden mountain ridges. The transition from darkness to daylight offers incredible color contrasts — a dream scenario for creative compositions. With Ijen’s Blue Fire photography tips, you’ll know how to adjust your settings to capture both low-light shots and golden-hour magic seamlessly. Whether you’re an amateur or a seasoned professional, planning your visit around these moments and using Ijen’s Blue Fire photography tips will help you turn Ijen’s mystical landscape into breathtaking works of art.
1. Understanding Ijen’s Climate and Weather
The weather plays a crucial role in determining the best time to visit Ijen for photography. The region experiences two main seasons:
- The dry season (April to October)
- The rainy season (November to March)
During the dry months, skies are clearer, trails are safer, and visibility is excellent — ideal conditions for both Blue Fire night photography and sunrise landscape shots. In contrast, the rainy season brings mist, slippery paths, and limited visibility, making it harder to capture clean compositions and vibrant colors. Therefore, photographers should plan their trip between April and October, when the chances of rain are minimal and the early morning air remains crisp and clear.
2. Best Time of Night for Blue Fire Photography
The famous Ijen Blue Fire is only visible in complete darkness, making timing critical. The ideal time to start the hike is around 12:30 AM to 1:00 AM, reaching the crater floor by 2:00 AM when the flames burn at their brightest. Since the phenomenon fades as dawn approaches, having your gear ready early gives you a narrow but magical window to capture those deep blue, otherworldly shots. Using long exposure techniques during this timeframe helps you capture the intensity of the flames without overexposure.
3. Best Time of Morning for Sunrise Photography
After photographing the Blue Fire, head back up to the crater rim to catch the Ijen sunrise around 4:30–5:30 AM. This transition from night to morning offers a spectacular light shift — the smoky volcanic air softens into pink, gold, and lavender tones. The moment when the first sunlight touches the emerald-green crater lake is pure magic for landscape photographers. This is truly the best time to visit Ijen for photography, as the interplay of light and mist gives your images depth and atmosphere that are impossible to replicate later in the day.
4. Seasonal Lighting and Color Conditions
During the dry season, sunlight tends to be sharper and more golden, perfect for vibrant photos with strong contrasts. The rainy season, while more challenging, can still reward you with moody compositions filled with fog and soft diffused light — great for a more dramatic or mysterious style. However, for most photographers, the best time to visit Ijen for photography remains during the dry months when lighting is predictable and the scenery unobstructed.
5. Ideal Days and Lunar Phases
If you want the most striking Blue Fire shots, avoid visiting during a full moon. Bright moonlight can overpower the flame’s glow, making it appear less intense. A new moon phase or a night with minimal moonlight is perfect for shooting vivid long-exposure photos. For sunrise shots, aim for clear mornings right after a light rain — the air tends to be cleaner, and visibility across the caldera improves dramatically.
In summary, the best time to visit Ijen for photography is during the dry season between April and October, arriving at 2:00 AM for the Blue Fire and staying until sunrise for the crater’s golden glow. By aligning your trip with these optimal conditions, you’ll be rewarded with the kind of stunning photographs that perfectly capture Ijen’s mystical beauty — from its glowing flames in the darkness to the first rays of dawn over one of Indonesia’s most extraordinary volcanic landscapes.
How to Reach Ijen Crater
From Banyuwangi
If you’re looking for the easiest and most practical route, starting from Banyuwangi is the best choice. This small city in East Java serves as the main gateway for travelers heading toward Mount Ijen. Reaching the base camp at Paltuding, where the hike to the crater begins, takes about 1.5 hours by car or motorbike. Most visitors stay overnight in Banyuwangi to rest and prepare for their midnight adventure.
To reach Banyuwangi itself, you can fly directly from major Indonesian cities like Jakarta, Surabaya, or Denpasar (Bali). Alternatively, you can take a train or bus. Once in Banyuwangi, local tour operators offer private 4WD transfers or shared tours that include transportation, guides, and gas masks. This convenience makes it perfect for photographers who want to focus on their craft rather than logistics.
For those following Ijen Blue Fire photography tips, it’s crucial to leave Banyuwangi by midnight to reach the crater before 2:00 AM. The hike from Paltuding to the rim is about 3 kilometers (1.8 miles), taking 1.5 to 2 hours depending on your pace. From there, you’ll descend another 700 meters into the crater to see the glowing blue flames — an unforgettable experience.
Photographers should also be prepared for the dark and steep trail. Bring a headlamp, tripod, and protective gear to ensure both safety and shooting stability. Reaching Ijen from Banyuwangi offers flexibility, stunning scenery, and the most convenient timing for your Ijen Blue Fire photography tips adventure.
From Surabaya
For travelers arriving from Surabaya, East Java’s capital, the journey to Ijen is longer but still rewarding. The drive takes approximately 6–7 hours by private car or tour van. You can also take a train from Surabaya’s Gubeng Station to Banyuwangi Baru, which takes about 7–8 hours but offers scenic views of East Java’s countryside.
If you’re flying, Surabaya’s Juanda International Airport connects easily to Banyuwangi by a short 45-minute flight. Once in Banyuwangi, continue to Paltuding as described above.
Following Ijen Blue Fire photography tips, it’s best to rest for a few hours after arriving, then depart around midnight to start your trek. Many professional photographers prefer traveling from Surabaya to Banyuwangi during the day, checking into local accommodations near the mountain, and organizing their gear ahead of time.
Packing light but smart is essential. Because you’ll be hiking at night, bring extra camera batteries, a flashlight, snacks, and water. Surabaya offers more tour options for those wanting a multi-day package that covers Bromo and Ijen — a favorite route among photography enthusiasts chasing both volcanoes’ iconic light displays.
Whether by road or air, the journey from Surabaya to Ijen gives photographers a comfortable setup to apply the best Ijen Blue Fire photography tips, ensuring you arrive on time and well-prepared for a night of stunning long-exposure shots.
Essential Gear for Capturing Blue Fire and Sunrise
Camera and Lenses
One of the most crucial Ijen Blue Fire photography tips is choosing the right gear. Since the Blue Fire appears in total darkness, you’ll need a camera that performs exceptionally well in low-light conditions. A mirrorless or DSLR camera with manual controls is a must.
Opt for a fast wide-angle lens — preferably f/2.8 or lower — to capture both the glowing sulfur flames and the crater’s vast landscape. A 24mm or 16–35mm lens gives a wide field of view, perfect for dramatic compositions. If you plan to shoot portraits of miners or details of the flame, bring a 50mm or 85mm prime lens.
Don’t forget spare batteries and memory cards — long exposures drain battery life faster in the cold mountain air. Following these Ijen Blue Fire photography tips ensures you don’t miss magical moments due to technical limitations.
Tripod and Filters
A sturdy tripod is your best friend when shooting long exposures at night. The Blue Fire’s glow is faint, so stability is essential. Choose a lightweight but solid carbon-fiber tripod for easy hiking without sacrificing balance.
Use ND filters for sunrise shots to manage the bright dynamic range between the sun and the crater lake. While filters aren’t needed at night, they become valuable at dawn when the light changes rapidly.
Pro tip: always set your tripod on firm ground and weigh it down with your backpack if winds are strong. These Ijen Blue Fire photography tips will help keep your shots sharp and avoid motion blur, even during longer exposure times.
Lighting and Safety Gear
Safety and visibility go hand-in-hand when hiking in darkness. A reliable headlamp frees your hands for camera adjustments while climbing. Bring a gas mask or respirator, as sulfur fumes near the crater are intense. Gloves, a scarf, and waterproof layers are also recommended.
From a photography standpoint, carry a small LED light or low-intensity torch to illuminate foreground elements without overpowering your composition. Always prioritize your well-being — stunning photos aren’t worth risking your health.
Among the top Ijen Blue Fire photography tips is this: gear up for both creativity and protection. The right equipment keeps you safe and ready for those once-in-a-lifetime shots.
Understanding Ijen’s Blue Fire Phenomenon
What Causes the Blue Fire
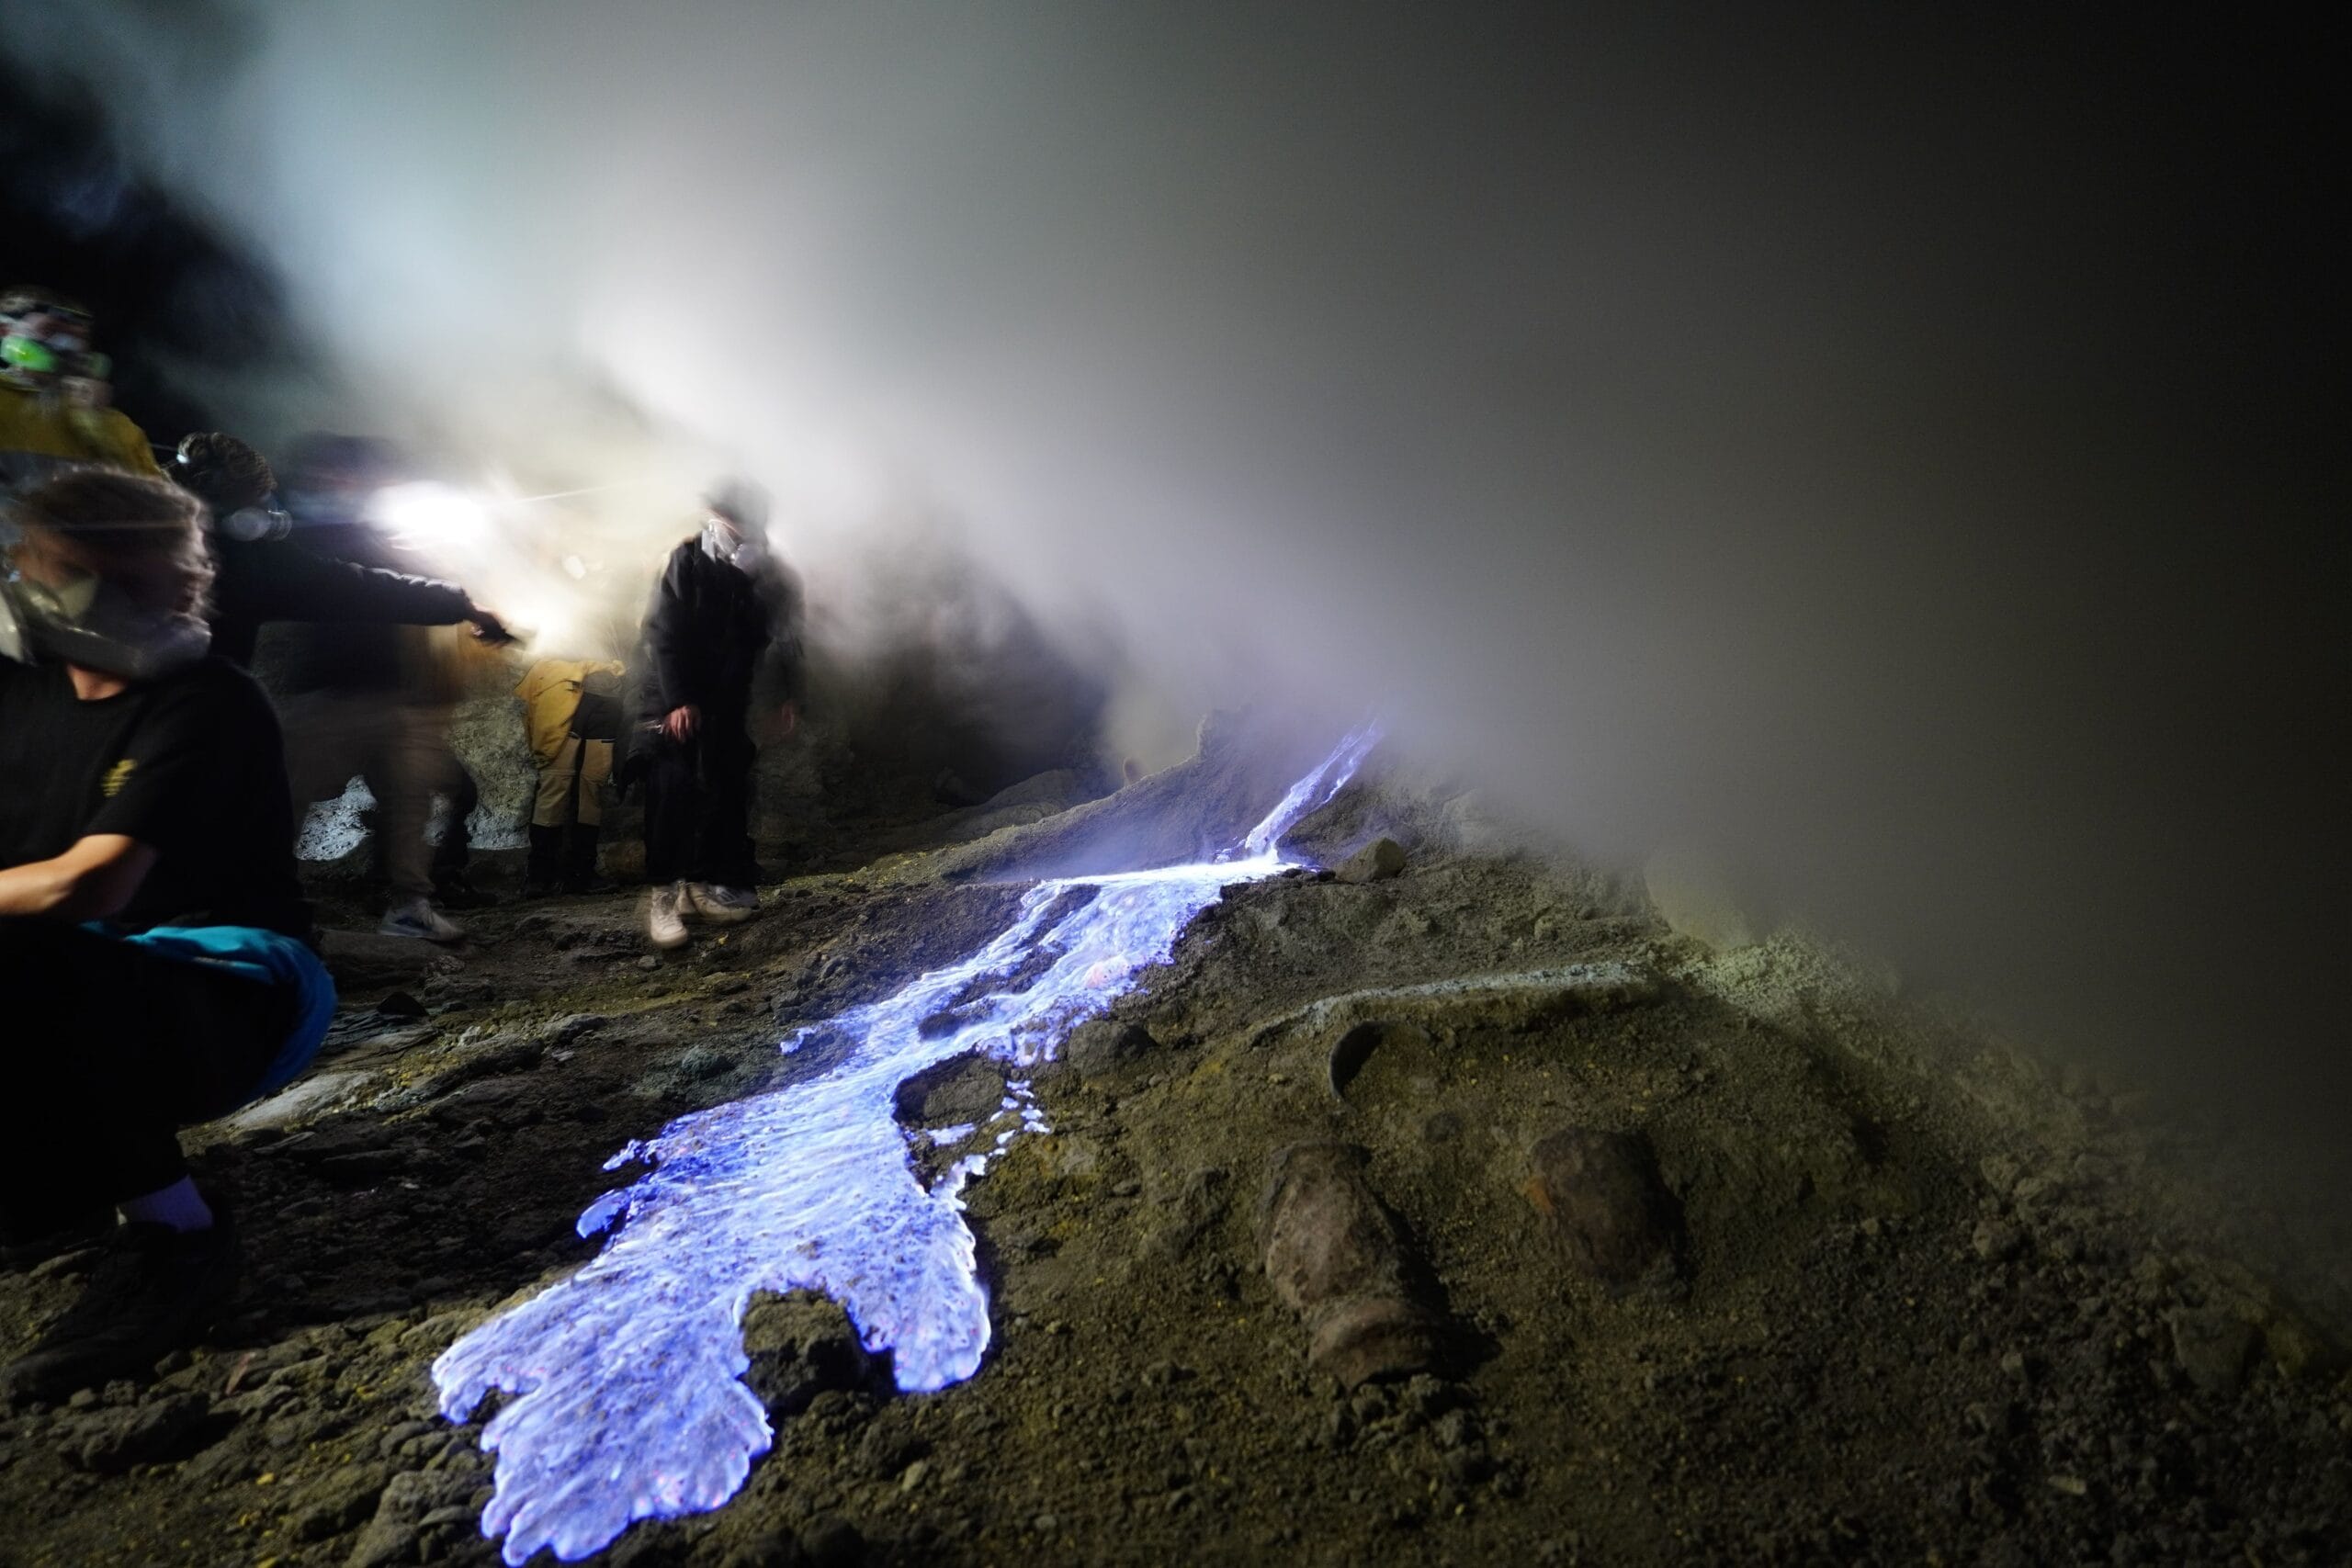
One of the most fascinating Ijen Blue Fire photography tips is understanding what you’re capturing. The Blue Fire isn’t molten lava — it’s the result of burning sulfuric gases escaping from cracks in the crater. When these gases ignite upon contact with oxygen, they produce a stunning electric-blue flame, visible only at night.
This phenomenon occurs at temperatures above 600°C (1,112°F), making it both beautiful and dangerous. The flames can rise several meters high, but they’re invisible under sunlight — which is why nighttime is the only time to witness and photograph them.
Knowing the science helps photographers plan better. For example, using a long exposure (10–30 seconds) at low ISO captures the flames’ flow and movement beautifully. Shooting from a slightly elevated angle also gives more dimension and texture to your Blue Fire shots.
Best Time to Capture It
The most important Ijen Blue Fire photography tips revolve around timing. The flames are best seen between 2:00 AM and 4:00 AM, when the crater is completely dark. Arriving earlier gives you time to find the perfect vantage point and adjust your camera before the light begins to change.
Avoid visiting during the full moon, as its brightness can wash out the Blue Fire’s glow. Opt for nights around the new moon for the most intense visuals. The dry season (April–October) is also ideal, as clear skies mean less mist interfering with long exposures.
Finally, plan your exit early — once dawn breaks, the flames fade, and sulfur clouds become dense. The best photographers always combine timing, safety, and creativity when following Ijen Blue Fire photography tips, ensuring each image captures the rare beauty of this natural wonder before it disappears into daylight.
Pre-Dawn Blue Fire Photography Tips
Photographing the mysterious Blue Fire at Ijen before dawn is both thrilling and technically challenging. At this hour, the air is cold, the light is minimal, and the sulfur fumes create a surreal atmosphere. To capture this rare sight successfully, you’ll need the right technique, patience, and creativity. Here are detailed Ijen Blue Fire photography tips to help you master your pre-dawn shots.
Camera Settings for Low Light
When shooting in near-total darkness, manual settings are your best friend. Set your camera mode to Manual (M) to have complete control over exposure. Start with an ISO between 800–1600, which balances sensitivity and noise. Open your aperture wide (f/2.8 or lower) to allow as much light as possible into the sensor.
Your shutter speed should range between 10 to 30 seconds, depending on how intense the flames are. Longer exposures capture more detail in the glowing blue streaks, creating a dynamic, almost fluid appearance. To avoid camera shake, always use a sturdy tripod and trigger the shutter with a remote release or timer.
For accurate focus, switch to manual focus and aim your lens at the brightest flame or a miner’s torch. Autofocus often struggles in low light, so pre-focusing is essential. Adjust your white balance to a cooler setting (around 3000–4000K) to maintain the true color of the blue flames — one of the most overlooked yet crucial Ijen Blue Fire photography tips.
Long Exposure Techniques
Long exposure is where the magic happens in Ijen Blue Fire photography tips. It’s what transforms faint blue glows into vivid, ethereal streams of light. Begin by stabilizing your tripod on solid ground — volcanic terrain can be uneven, so dig the legs slightly into the ash for better grip.
Use Bulb Mode if your camera supports it. This lets you manually control the duration of exposure beyond 30 seconds. The key is to experiment: shorter exposures (8–10 seconds) reveal sharper flames, while longer ones (20–30 seconds) create soft, dreamy trails of light.
To prevent overexposure from miner torches or reflected light, use your hand or a dark card to briefly block the lens mid-exposure if needed. This trick balances highlights without losing shadow detail. Finally, always shoot in RAW format — it gives you the flexibility to fine-tune colors, contrast, and noise later without degrading quality.
Composition in Darkness
Composing in total darkness can be disorienting. The trick is to visualize the scene using light sources and movement. Include foreground elements like sulfur rocks, miners, or reflections in puddles to create depth. These layers make your photo tell a story rather than just document light.
One of the best Ijen Blue Fire photography tips is to position yourself at an angle that captures both the flames and the surrounding crater walls. The contrast between fire and terrain creates drama and context. You can also try silhouettes — miners illuminated by the blue glow make for powerful storytelling compositions.
Avoid crowding your frame. Since the Blue Fire is already visually intense, negative space (like the dark crater floor or night sky) adds balance. If the smoke is thick, use it creatively as a diffused element — it can soften harsh light and add a mysterious feel. With patience and experimentation, the darkness becomes your canvas, and every shot becomes a work of art.
Capturing Ijen Sunrise from the Rim
Once the Blue Fire fades with the first light of dawn, a new photographic opportunity unfolds: the magnificent Ijen sunrise over the turquoise crater lake. As sunlight spills across the rim, the smoky, sulfur-stained landscape transforms into a painting of gold and aqua. These Ijen Blue Fire photography tips will help you seamlessly transition from night shots to golden-hour brilliance.
Best Sunrise Viewpoints
The best viewpoints for sunrise photography are located along the eastern rim of the crater. From here, you’ll get an unobstructed view of the rising sun and its reflection on the lake’s emerald surface. Arrive early — right after finishing your Blue Fire shots — to secure a good position before the crowds arrive.
If you hike slightly north from the main viewpoint, you’ll find quieter spots where you can capture wide panoramas with fewer people. Including the silhouettes of Tengger Mountains or Mount Merapi in the distance adds a stunning backdrop.
A key Ijen Blue Fire photography tip is to use the pre-dawn light (before sunrise) for “blue hour” shots. This period, when the sky glows deep indigo and the crater still emits faint sulfur smoke, offers incredible atmosphere. The contrast between the lake’s turquoise hue and the soft blue sky gives your photos an almost surreal quality.
Golden Hour Settings
When the sun finally rises, light conditions shift rapidly. Adjust your camera settings to handle the stronger brightness. Use ISO 100–200, aperture f/8–f/11, and shutter speed between 1/100–1/250 sec, depending on the intensity of light.
To retain details in both the highlights and shadows, enable exposure bracketing — take several shots at different exposures and blend them later in post-processing for an HDR effect. This technique is among the most effective Ijen Blue Fire photography tips for balancing the high-contrast sunrise scene.
Remember, sunrise over Ijen isn’t just about the sky — it’s about the reflections. Capture the sun’s rays glistening on the lake, and use natural elements like smoke, rocks, and sulfur crystals to frame the light dynamically.
Framing the Crater Lake
Composition during sunrise is all about storytelling. To make your images more engaging, frame the crater lake using the rim’s rocky edges or nearby volcanic features. Leading lines — like the hiking path or ridges — can draw the viewer’s eye into the center of your image.
Another valuable Ijen Blue Fire photography tip is to include a human element in your frame. A single figure standing against the sunrise adds scale and emotion, emphasizing the vastness of nature. You can also use a polarizing filter to deepen the lake’s color and reduce glare.
As the light strengthens, experiment with wide and telephoto lenses. Wide shots capture the grandeur, while zooming in highlights details — such as steam rising off the lake or sunlight piercing through mist. Always stay aware of your surroundings, as the rim can be slippery, and the sulfur fumes remain active even in daylight.
In essence, sunrise at Ijen is the perfect conclusion to your Ijen Blue Fire photography tips journey. From the mystical glow of midnight flames to the golden warmth of dawn, every moment offers a fresh perspective — proof that Ijen is not just a destination but a visual symphony waiting to be captured.
Balancing Blue Fire and Sunrise Shots
One of the biggest challenges for photographers at Mount Ijen is balancing the Blue Fire in pre-dawn darkness with the vibrant sunrise that follows. Capturing both requires careful timing and adaptability, as lighting conditions shift dramatically within minutes. Start by focusing on the flames between 2:00 and 4:00 a.m. using long exposure settings to highlight the deep blue glow against the dark volcanic rocks. As the sky begins to lighten, gradually adjust your ISO and shutter speed to maintain clarity and contrast. Following Ijen’s Blue Fire photography tips helps you manage this transition smoothly, ensuring that each moment — from the flickering flames to the first touch of dawn — is captured in perfect harmony.
Once the sun rises, the scene transforms into a completely new composition. The crater lake glows turquoise, the sulfur smoke becomes golden, and the surrounding ridges take on warm, textured tones. This is where creativity truly shines — using the soft morning light to frame the landscape after capturing the night’s drama. With Ijen’s Blue Fire photography tips, you can skillfully balance the mystical energy of the Blue Fire with the peaceful beauty of sunrise, creating a series of photos that tell a complete and unforgettable story of Ijen’s dual magic.
Using a Drone for Ijen Photography
Using a drone at Mount Ijen opens up an entirely new perspective for photographers, allowing you to capture the crater, lake, and volcanic ridges from breathtaking aerial angles. The combination of the glowing Blue Fire below and the vast landscape above creates cinematic shots that are impossible to achieve from the ground. However, flying a drone in Ijen requires careful planning — the area is windy, and the sulfur gases can interfere with visibility and drone sensors. By following Ijen’s Blue Fire photography tips, you can plan flight paths that safely capture the crater’s stunning contrasts while avoiding damage to your equipment. Always check local regulations and weather conditions before flying to ensure a smooth and responsible experience.
As dawn approaches, a drone becomes even more powerful for storytelling. You can transition from dramatic low-light footage of the Blue Fire to sweeping panoramic views of the sunrise over the turquoise lake and surrounding peaks. This blend of perspectives helps showcase the full beauty of Mount Ijen’s environment. Applying Ijen’s Blue Fire photography tips ensures you optimize drone settings for shifting light — adjusting exposure, filters, and camera angles to maintain natural colors and depth. With thoughtful planning and creative composition, drone photography can transform your Ijen shots into breathtaking works of art that capture both its mystery and majesty.
Post-Processing Tips for Blue Fire and Sunrise Photos
Enhance your shots with subtle edits:
- Increase contrast and clarity to emphasize textures.
- Adjust white balance for natural tones.
- Use dehaze and vibrance tools to make the flames and sky pop.
Safety Tips While Photographing at Ijen
- Always wear a gas mask to protect from sulfur fumes.
- Stay with your guide and follow designated paths.
- Carry plenty of water and wear proper hiking shoes.
- Avoid standing too close to the crater edge—it’s slippery and unstable.
Cultural Insight: Miners of Ijen
The sulfur miners of Ijen carry loads up to 70–90 kg on their shoulders daily. Their resilience adds a deep human connection to Ijen’s natural wonder. Be respectful when photographing them—always ask permission and consider tipping as a token of gratitude.
Conclusion
Photographing Ijen’s Blue Fire and Sunrise isn’t just about taking pictures—it’s about experiencing one of Earth’s most magical spectacles. From the glowing flames to the serene morning light, every moment is a reminder of nature’s power and beauty. Come prepared, stay safe, and let Ijen’s mystical energy ignite your creativity.